Welcome to Week 2! We’re building the project from bottom to top. We’ve finished the bottom most strip in week 1 and will now crochet strip 2 till 19.
There are four different ways to start a new colour. In week 1 we had two different methods: the very first panel started with chain 6 after a slip knot. This is the only time you start like this. From the second panel forward, you attached on one side: the side of the previous panel in the same strip.
For the English UK version of this pattern: Scheepjes Crochet in my DNA MAL – Week 2 UK
Voor de Nederlandse versie van dit deel van het patroon: Scheepjes Crochet in my DNA MAL – Week 2
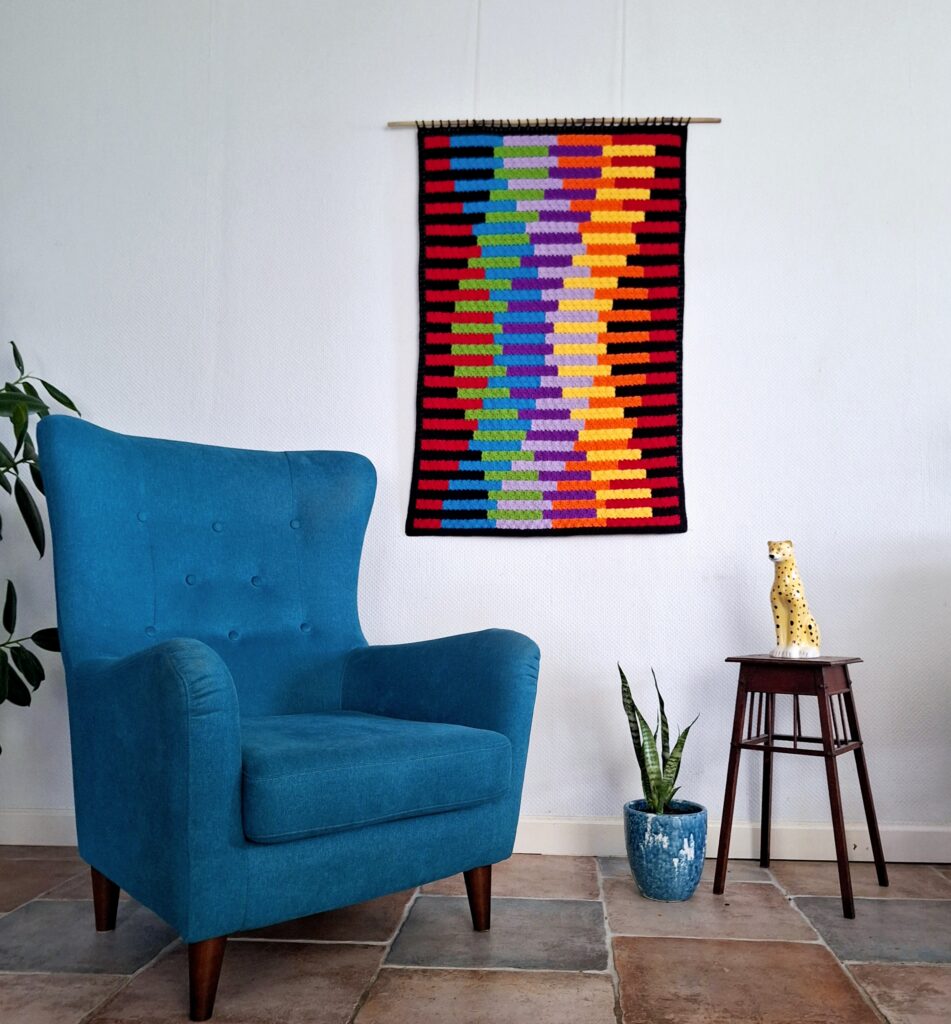
Now, in Week 2, we’ll start strip 2. The bottom of strip 2 is attached to the top of strip 1. You attach the first panel of this week only on strip 1, but then the next four panels are attached on the bottom (in strip 1) and also in the side (of the previous panel on strip 2).
You won’t be attaching in the exact same manner for each panel. This has to do with the direction (horizontal/vertical) and orientation (front/back) of the double crochets in each block. With the C2C technique, you want the blocks to diagonally have the same direction and orientation.
Please pay close attention to the way in which you attach. Check for each panel whether the blocks are running smoothly in diagonal direction and whether the blocks directly adjacent to each other are therefore opposites of each other.
In this week, we’ll finish the bottom half of the project. You’ll learn three different ways of attaching: at the beginning of the strip (with chain 6), to make a horizontal block first and finally to make a vertical block first. You’ll need all three methods in this project.
Content
Videos
Left handed video
Right handed video
Strip 2
Strip 2 – Panel 1: 2 blocks high and 16 blocks wide; Colour E
Start in a corner exactly on the corner, above the place where you started panel 1 of strip 1, with Colour E. Pull a slip knot through this hole.
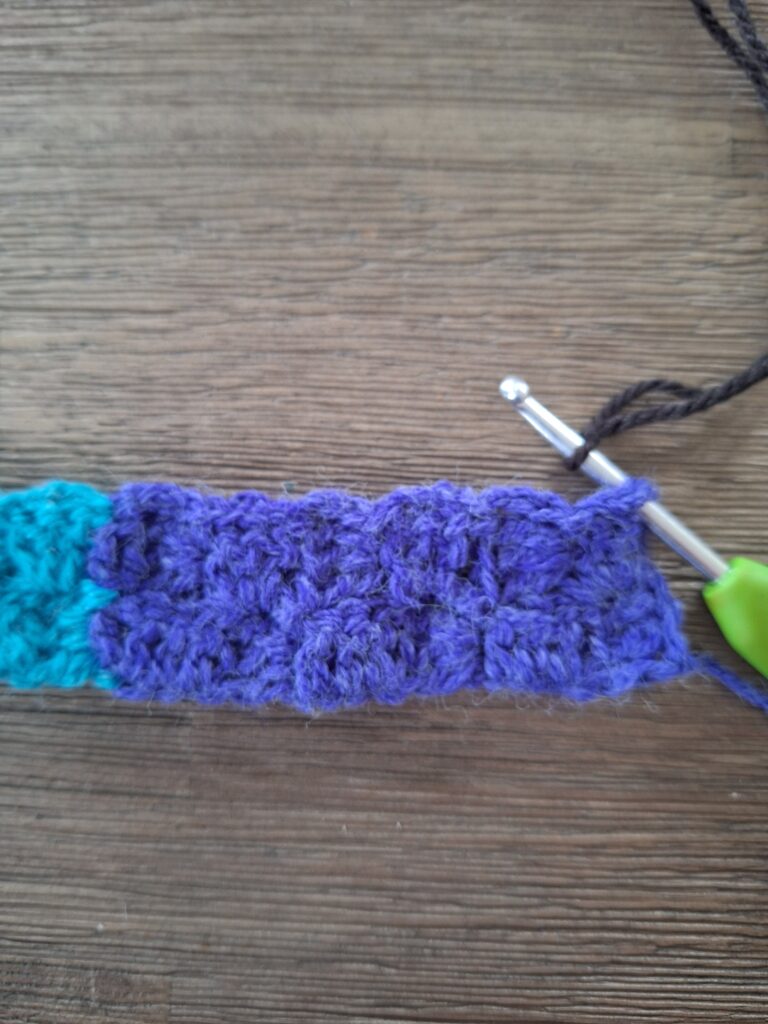
You can fasten your end a little bit already, by chaining the first chain with double yarn: the yarn end and the normal yarn. This makes the chance of unraveling smaller. It’s not absolutely necessary, so you can also chain 6 as normal.
Chain 1 with both ends
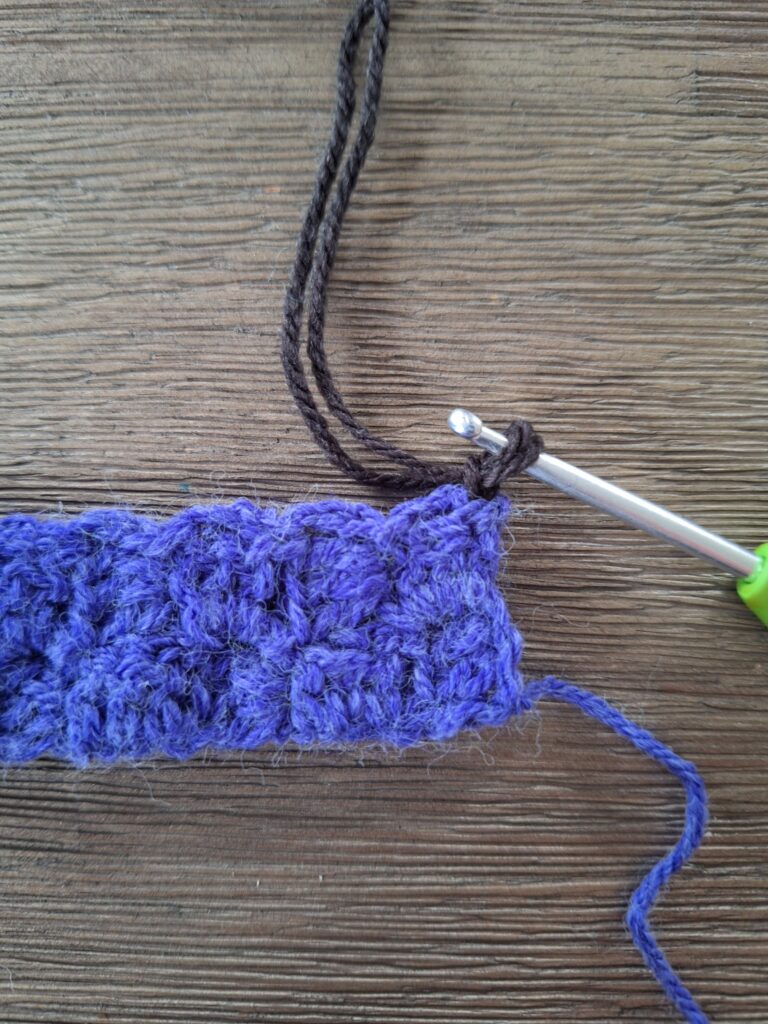
Chain 5 as normal. You’re going to make a block that has the opposite direction and orientation than the block sitting adjacent. You need to pay attention to this whenever you attach a new colour.
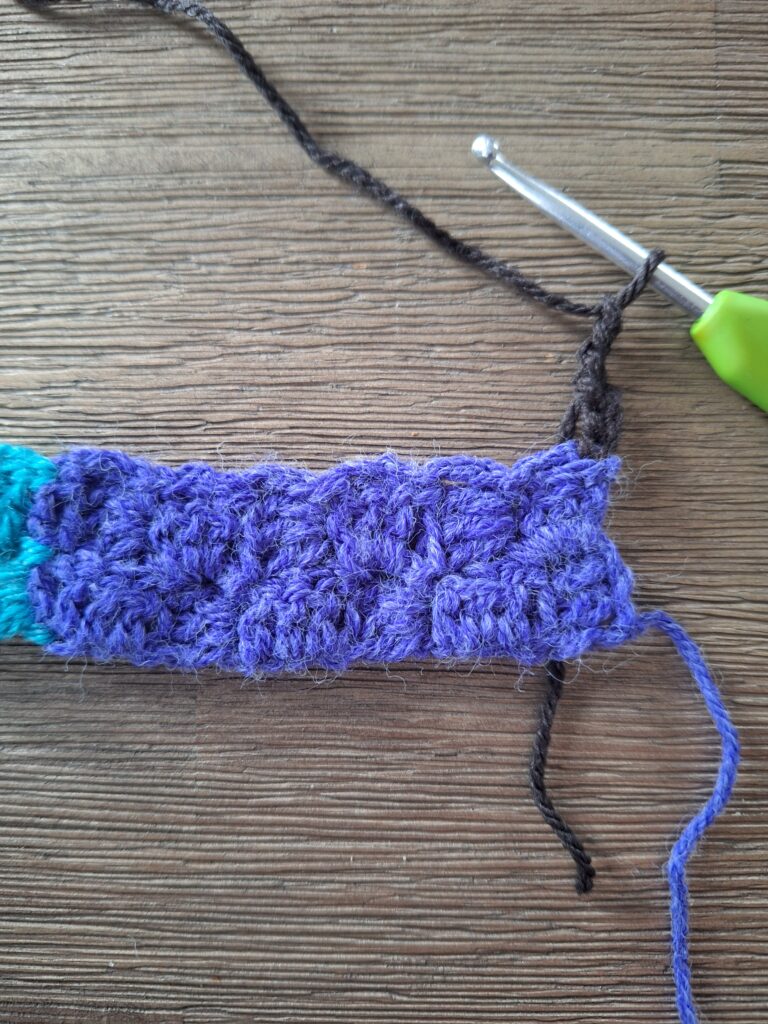
Double crochet into the 4th, 5th and 6th chain from the hook.
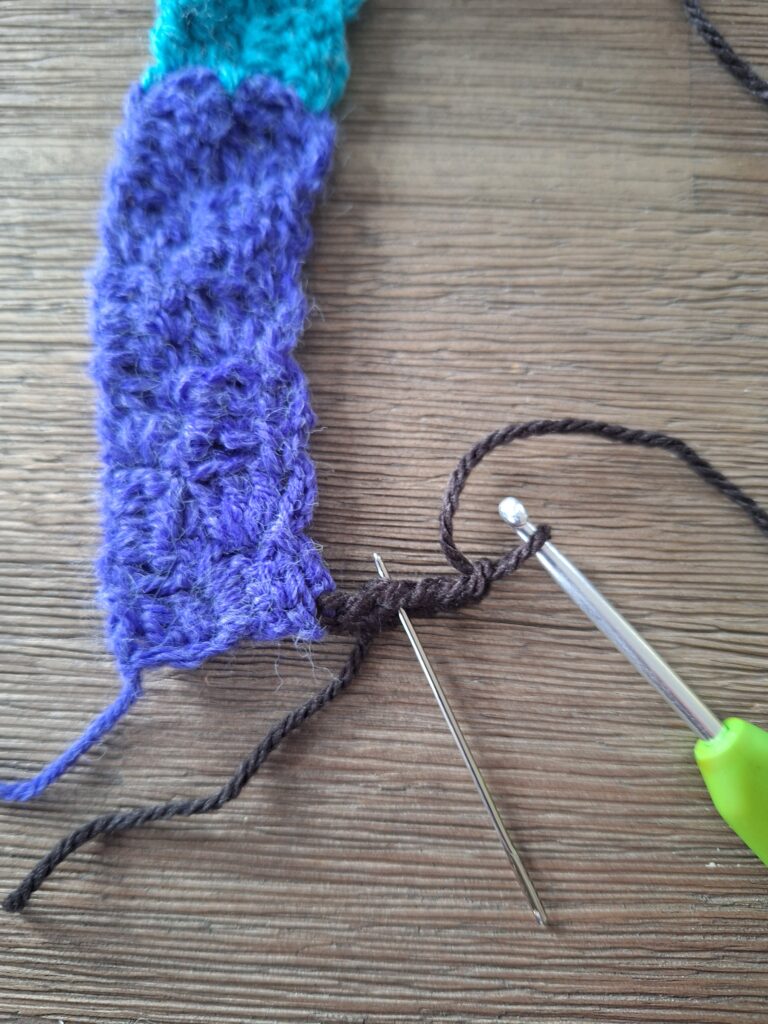
Slip stitch into slip stitch between 2 blocks (see the needle in the picture below)
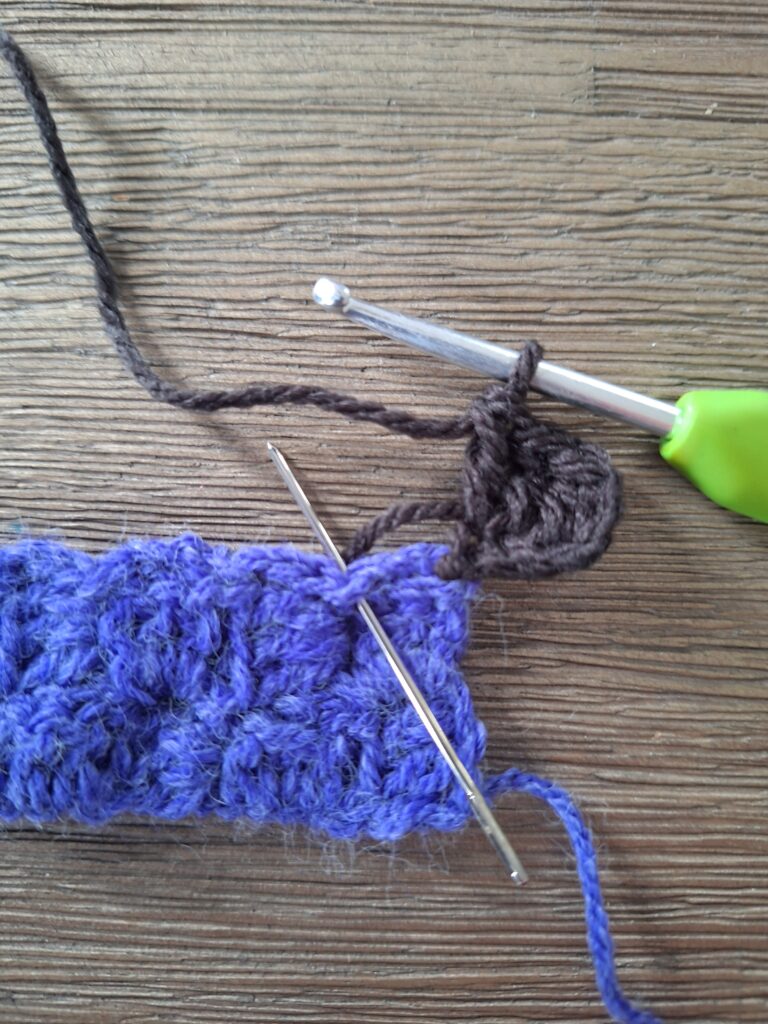
Chain 3. Slip stitch into slip stitch between next two blocks (see the needle in the picture below)
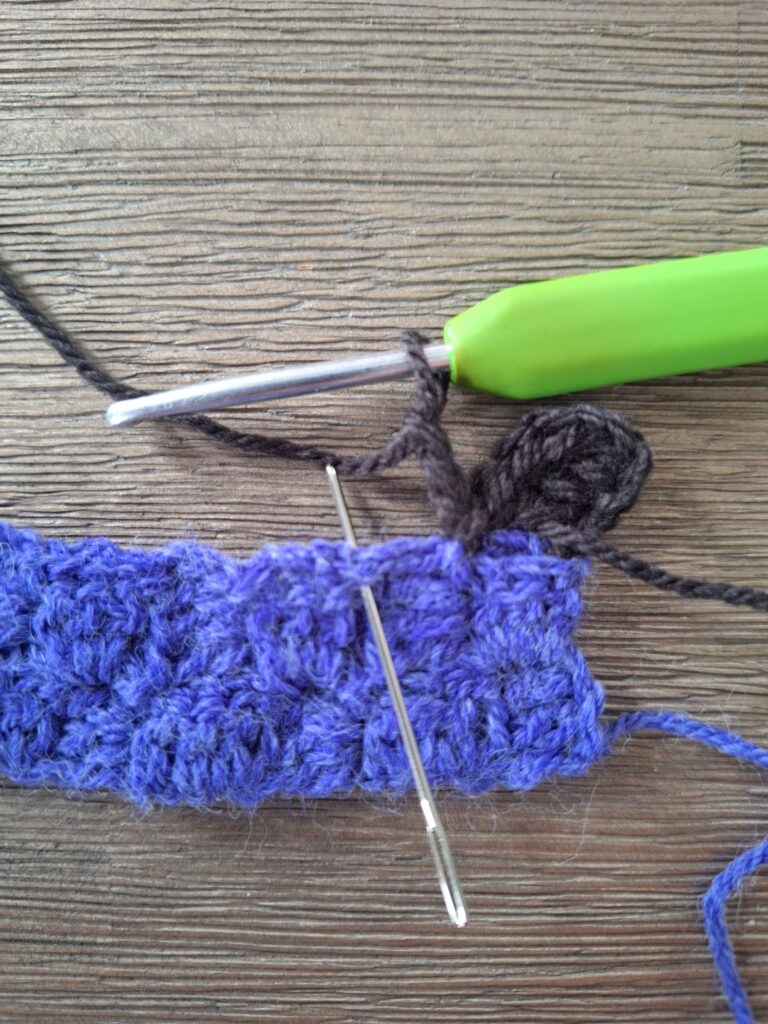
Chain 3
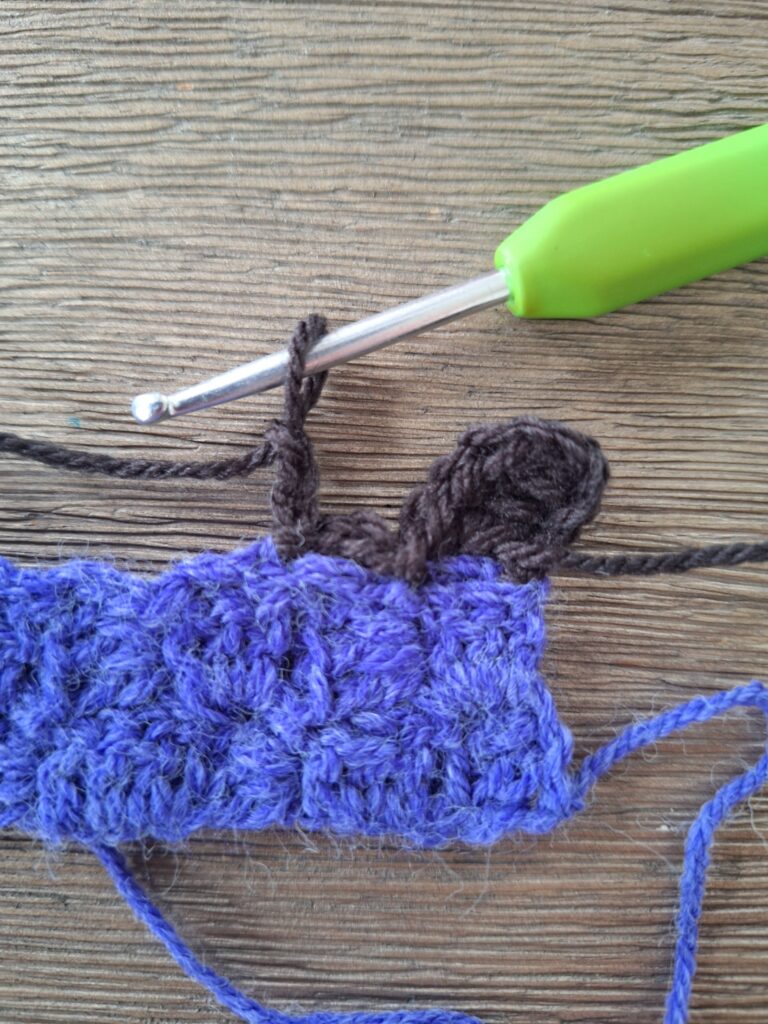
If you’d like, you can darn away your end here. Put it in a darning needle, pull it through the last double crochet and through the chain 3. Turn
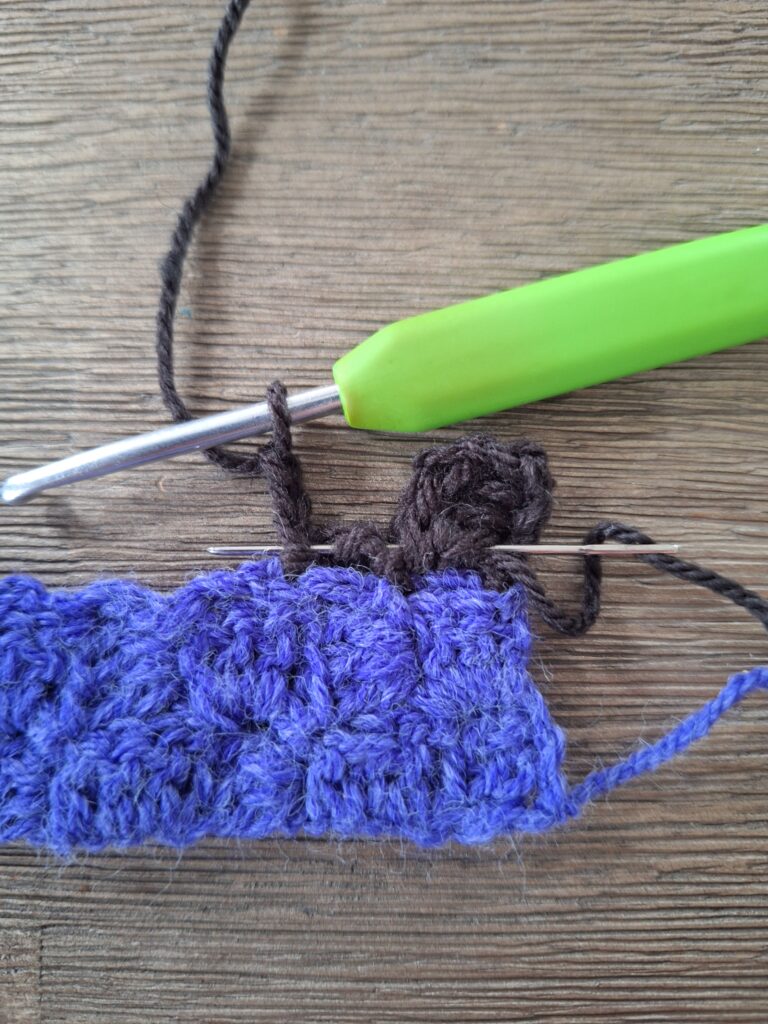
3 double crochet into the chain space you’ve just made (see darning needle in the picture below). Please pay attention you always use the chain space of the same colour and not (accidentally) the chain space of the panel below. You’re inserting your hook below the Colour E chain space, not below the Colour A chain space.
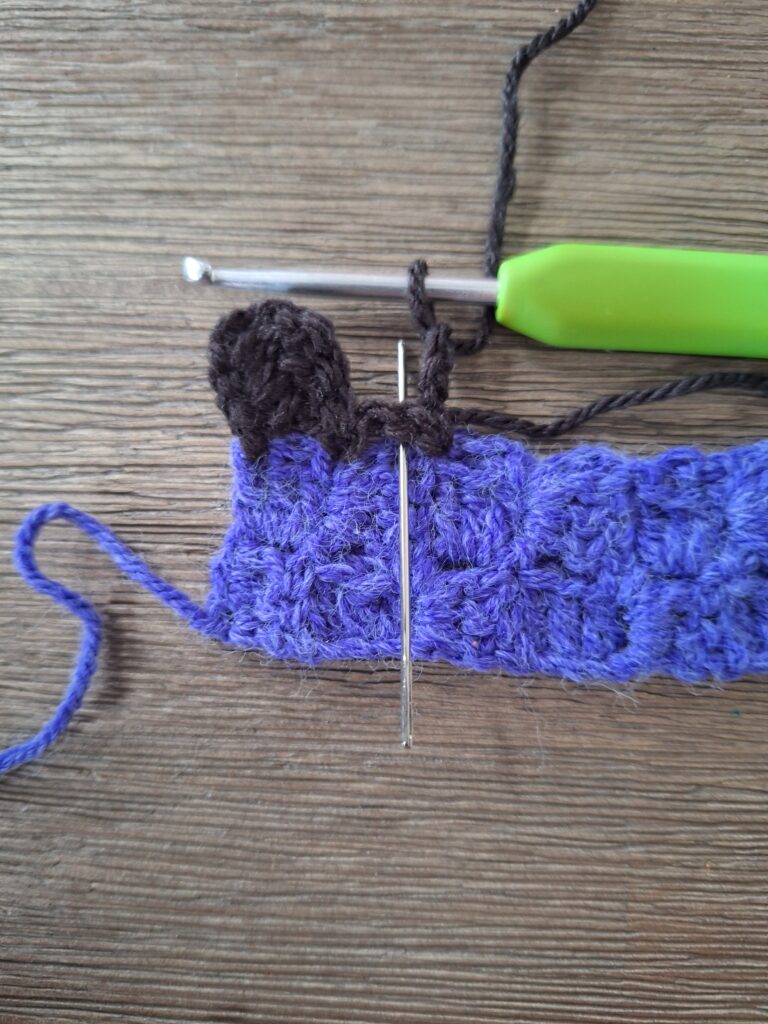
Slip stitch into chain space (see the needle in the picture below)
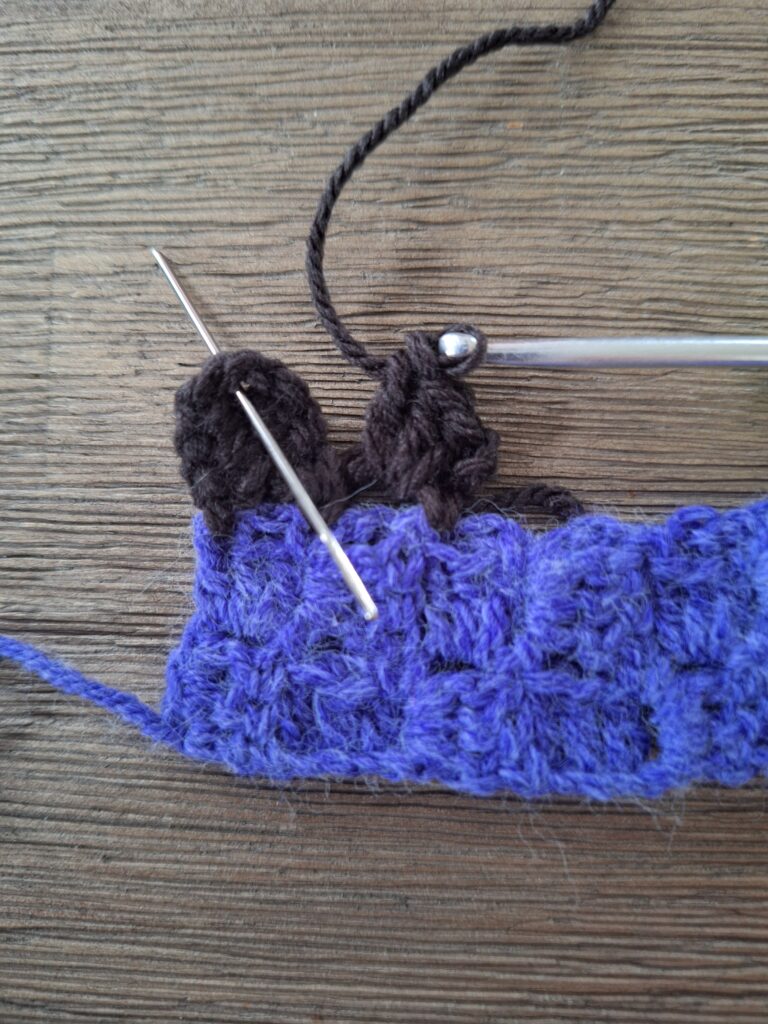
Chain 3, 3 double crochet into the same space
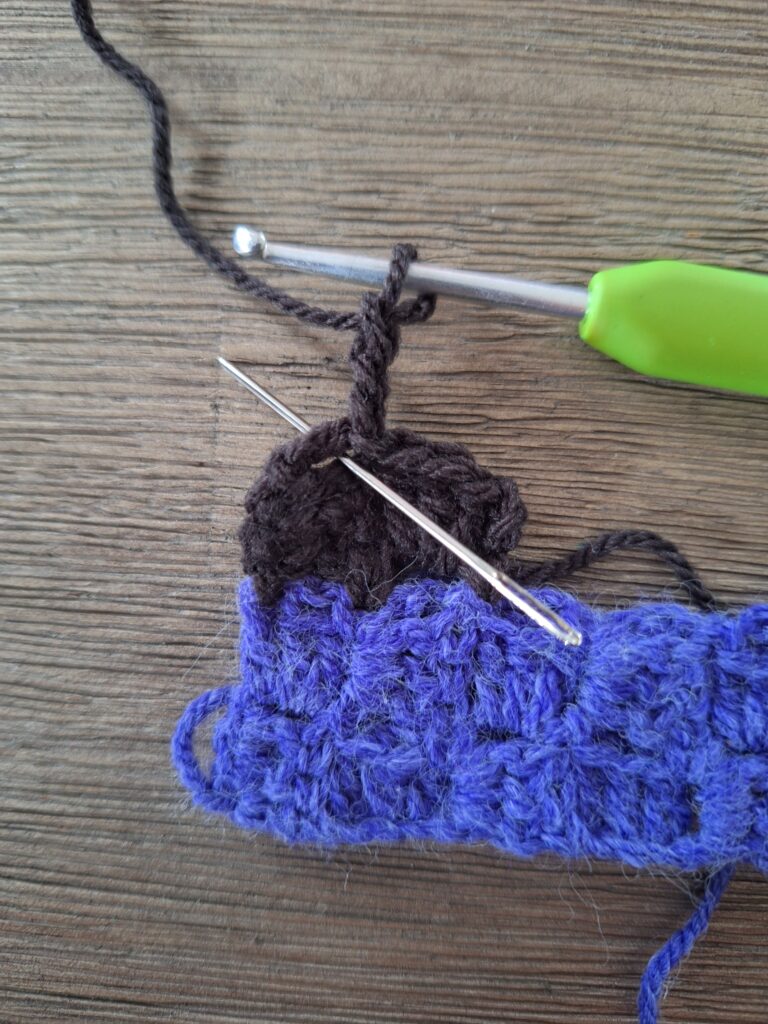
You’ve reached the height of this panel. Chain 3, turn
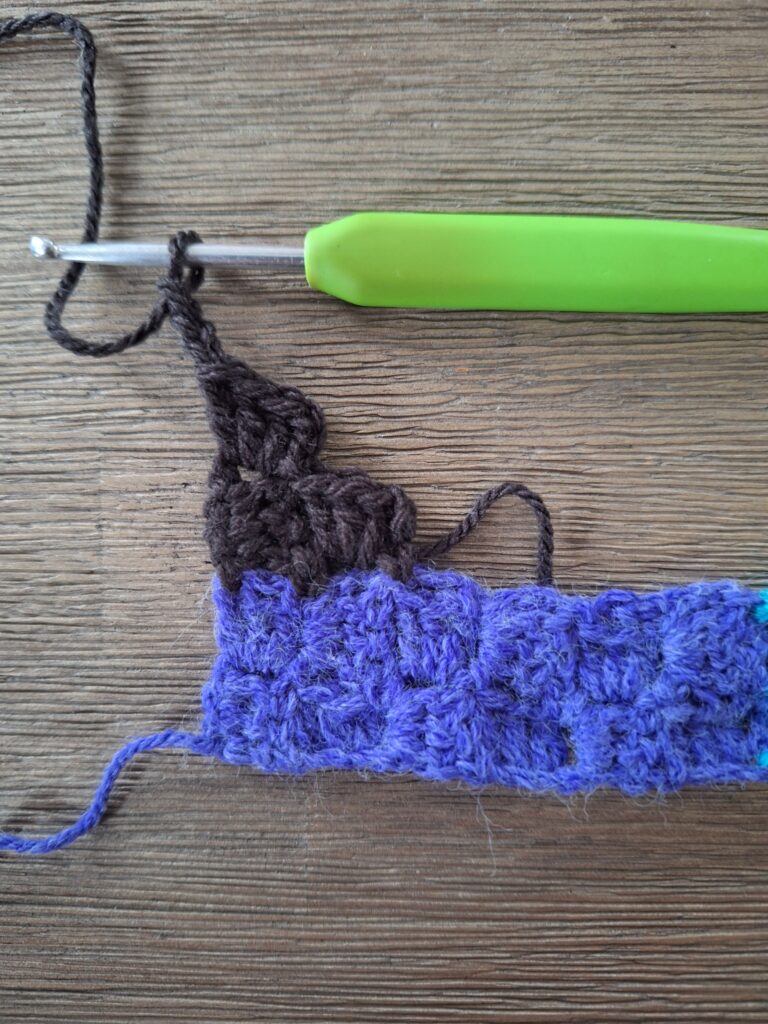
Slip stitch into chain space of the last made block (see the needle in the picture below)
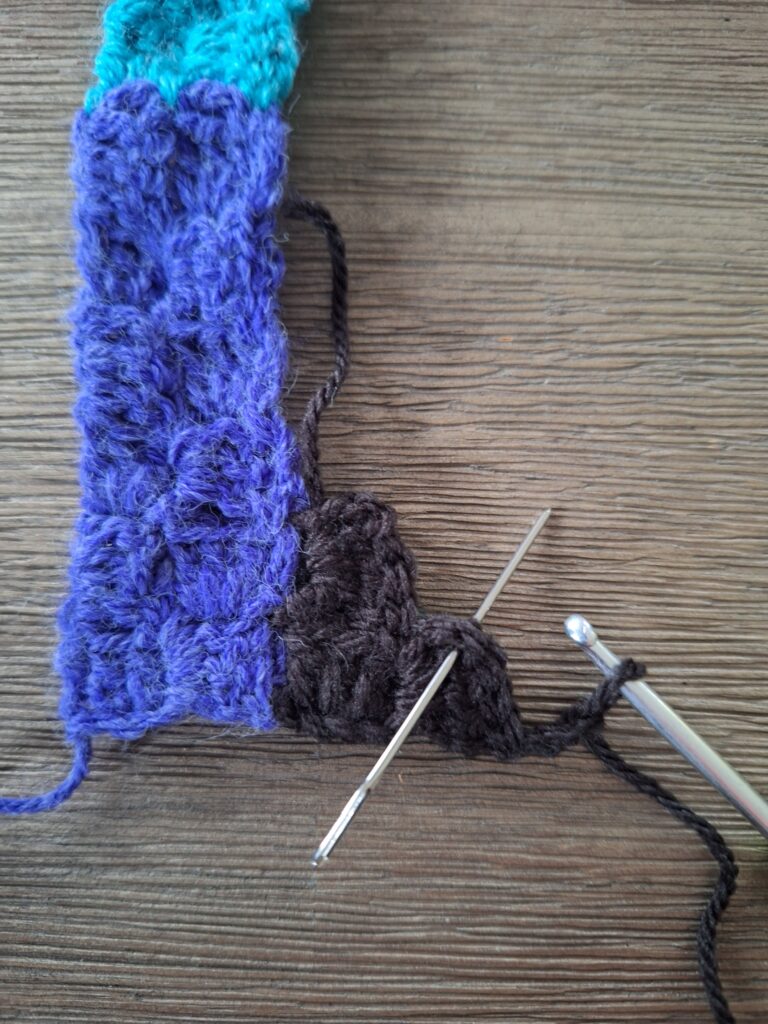
Chain 3, 3 double crochet into the same space (see the needle in the picture below)
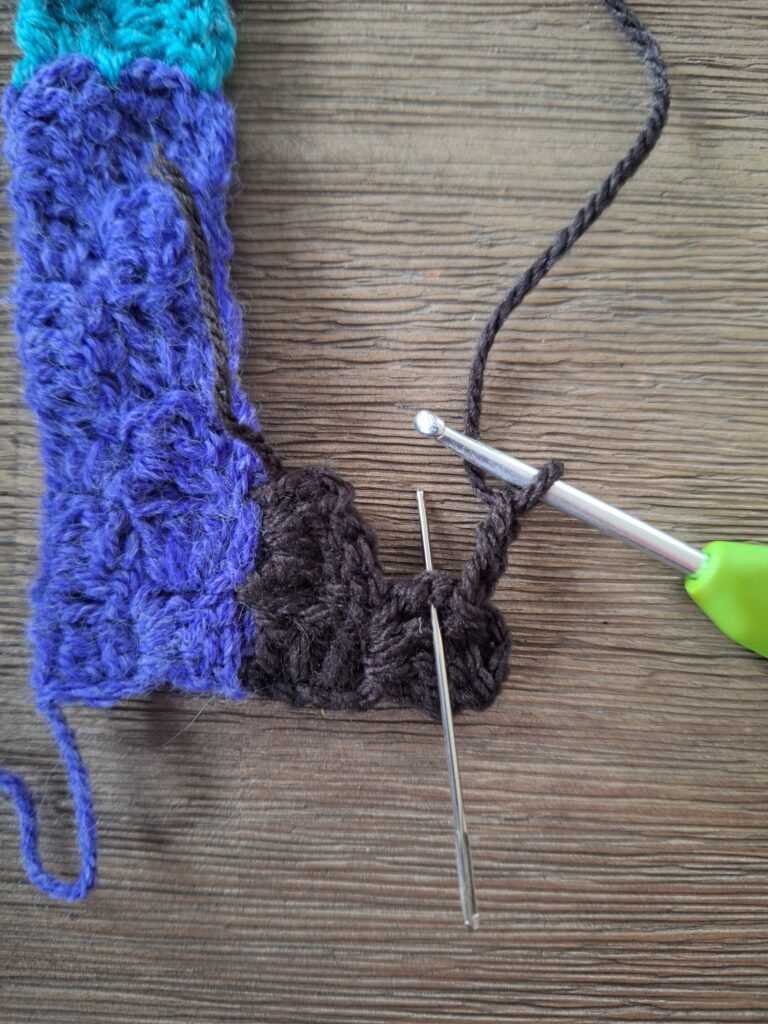
Slip stitch into the next chain space, chain 3, 3 double crochet into the same space (see the needle in the picture below)
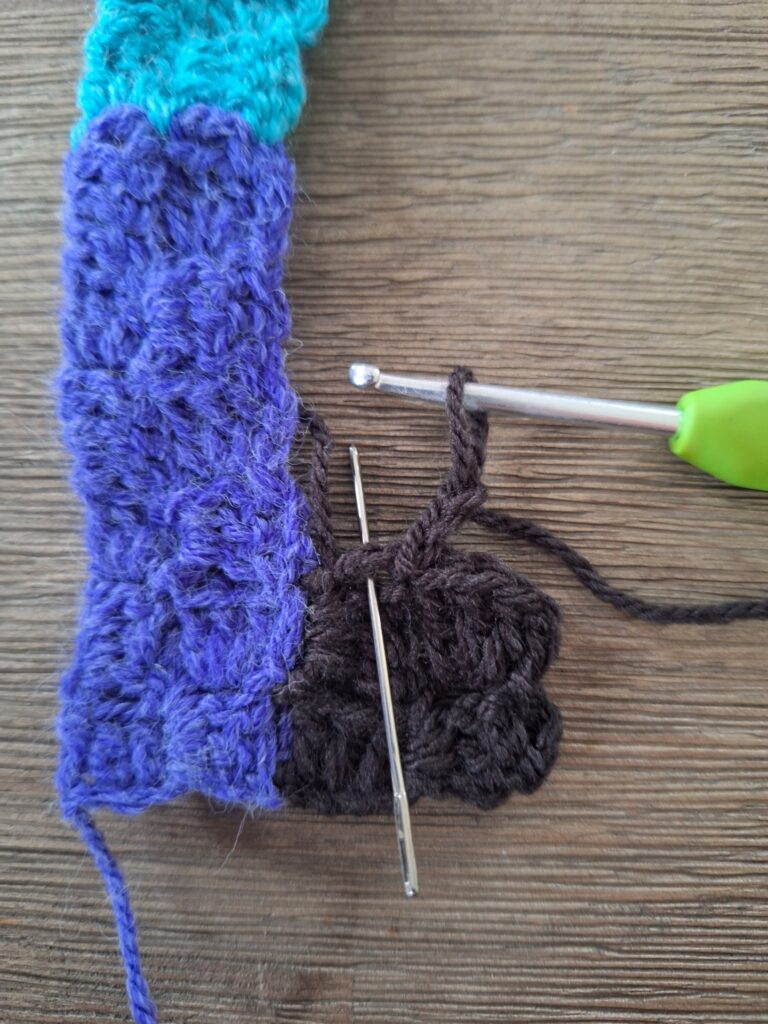
Slip stitch into the slip stitch between the next 2 blocks (see needle in the picture below)
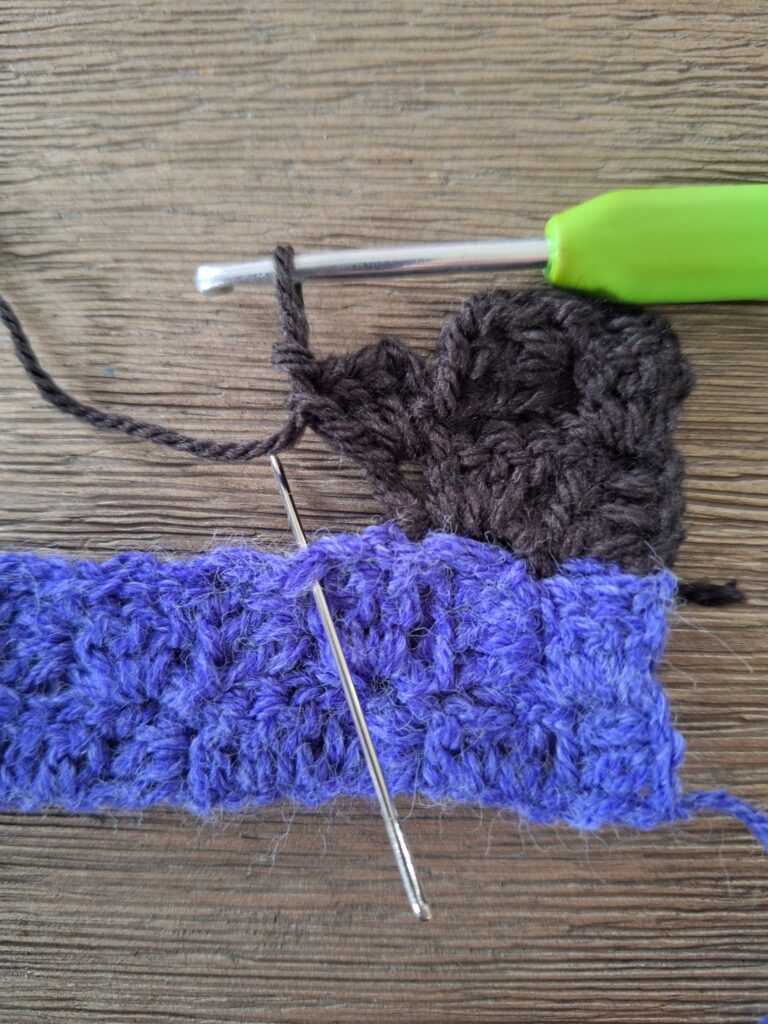
Chain 3, slip stitch into the slip stitch between the next two blocks (see needle in picture below)
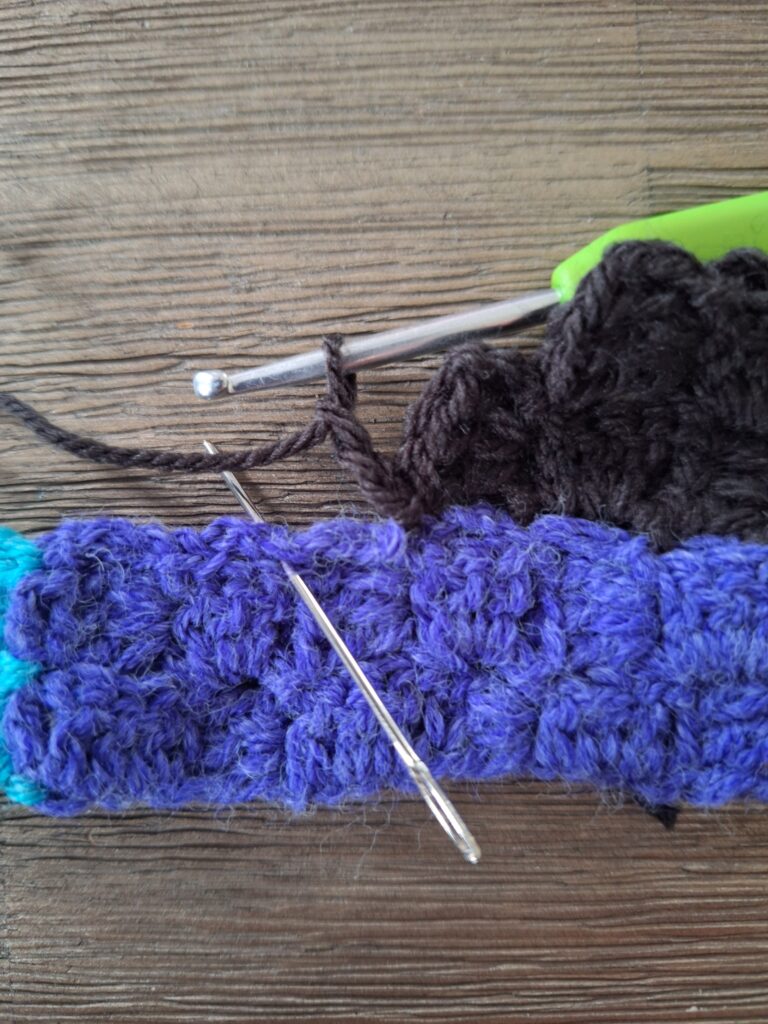
Chain 3, turn
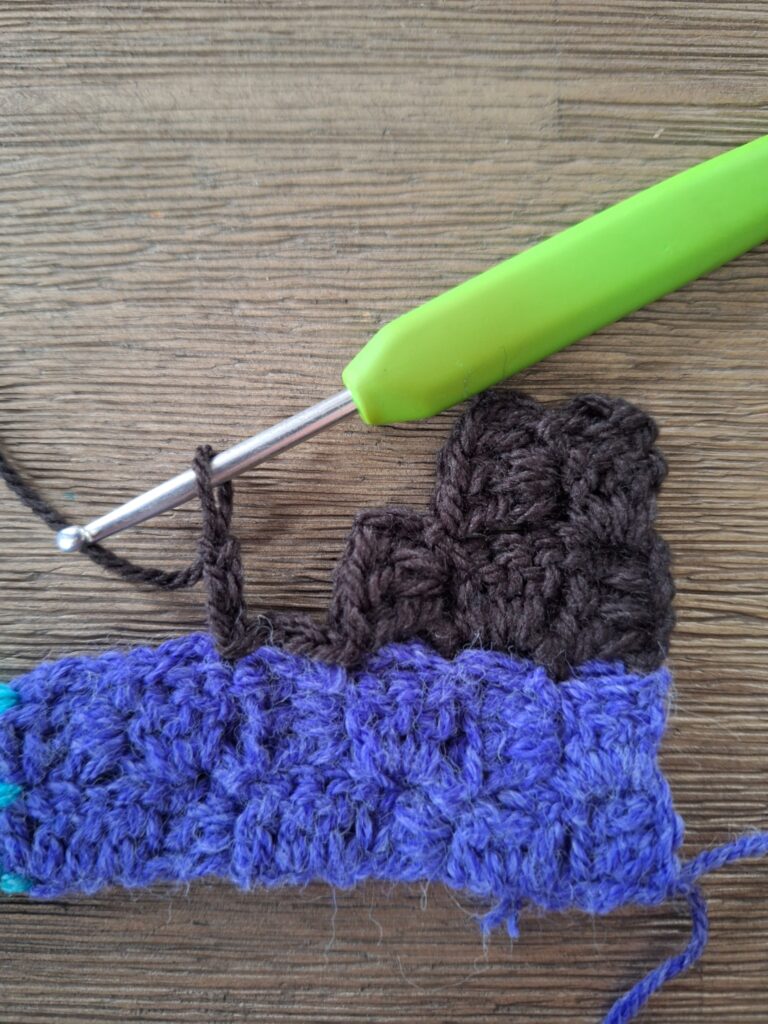
Chain 3, turn. Make 3 double crochet into the chain space you just made (pay attention to doing it in the same colored chain space, not the one beneath it)
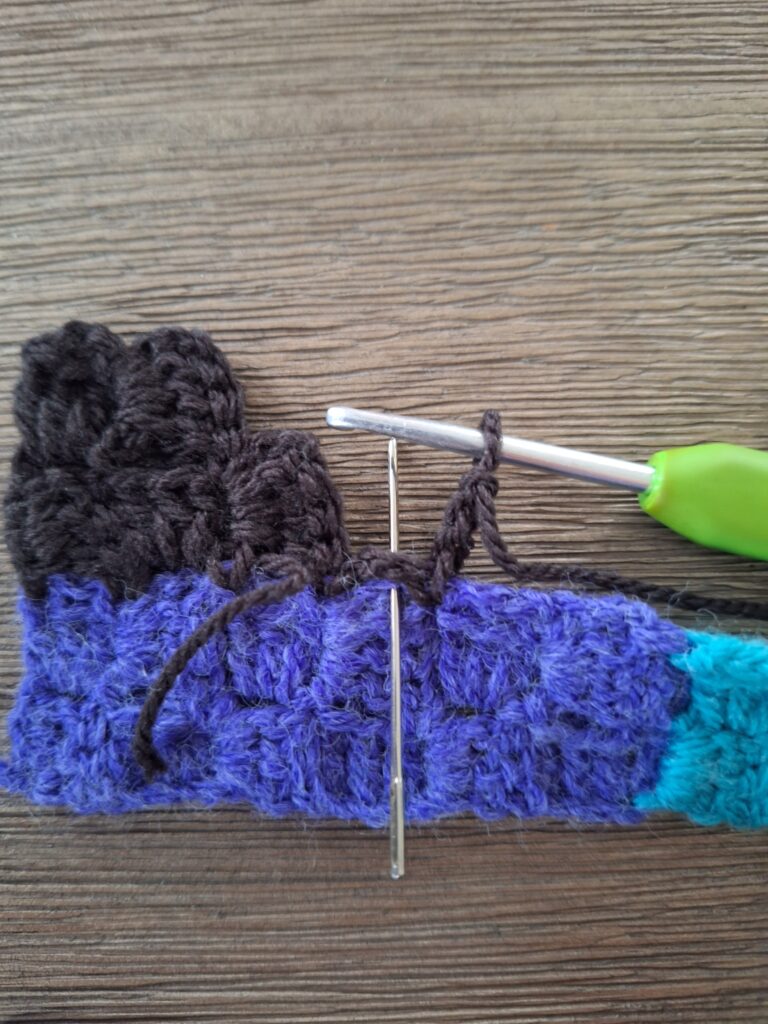
Slip stitch into the next chain space, chain 3, 3 double crochet into the same space. Slip stitch into next chain space, chain 3, turn.
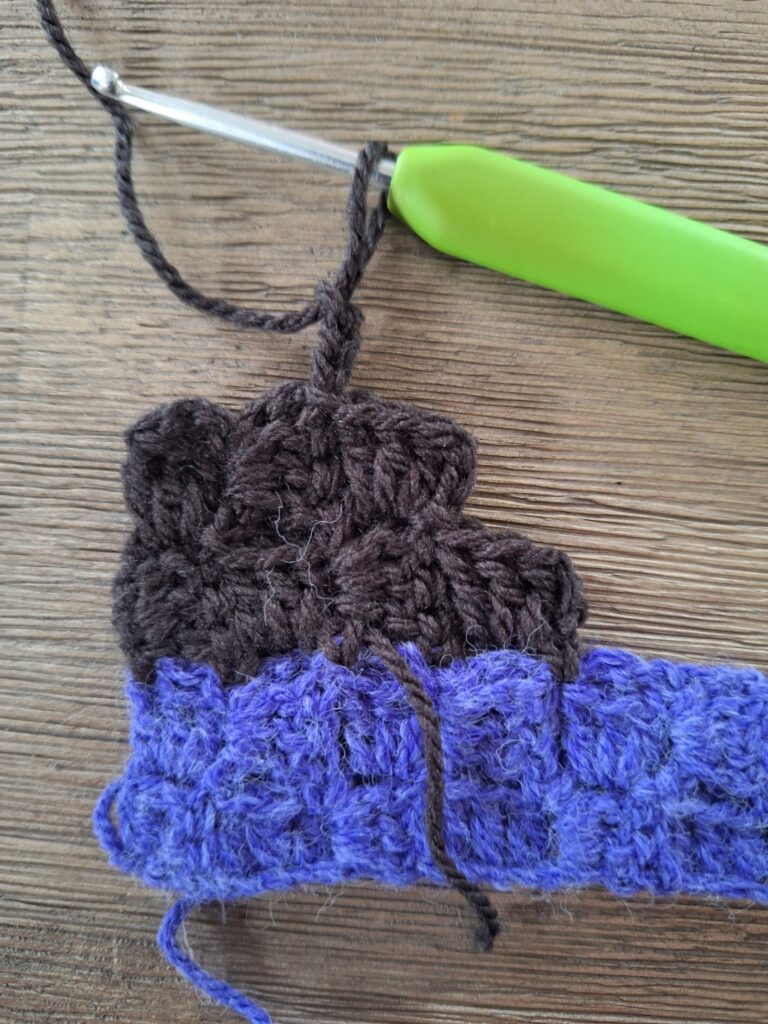
Slip stitch into the chain space of the same block. Chain 3, 3 double crochet into the same space, slip stitch into the next space, chain 3, 3 double crochet into the same space.
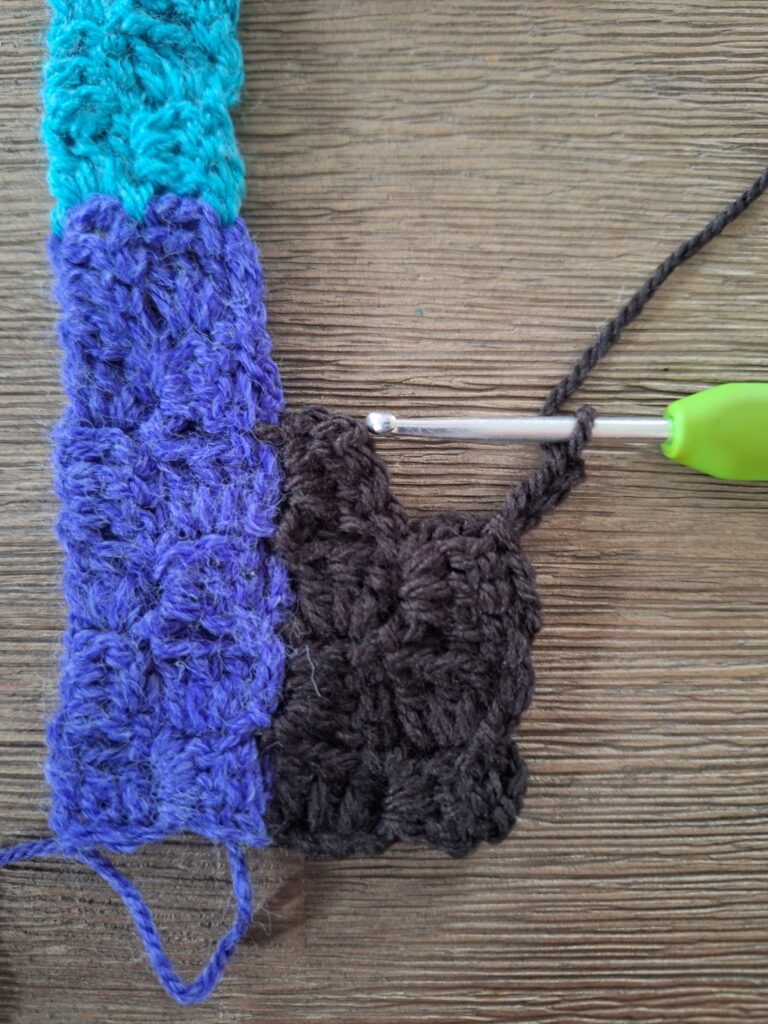
Slip stitch into the next slip stitch between blocks.
When you’re at a colour change of a previous strip, always use the hole you’ve already crocheted into. You use the same hole again. Do this consistently during the project.
Chain 3, slip stitch into the slip stitch between 2 colours (see needle in the picture below).
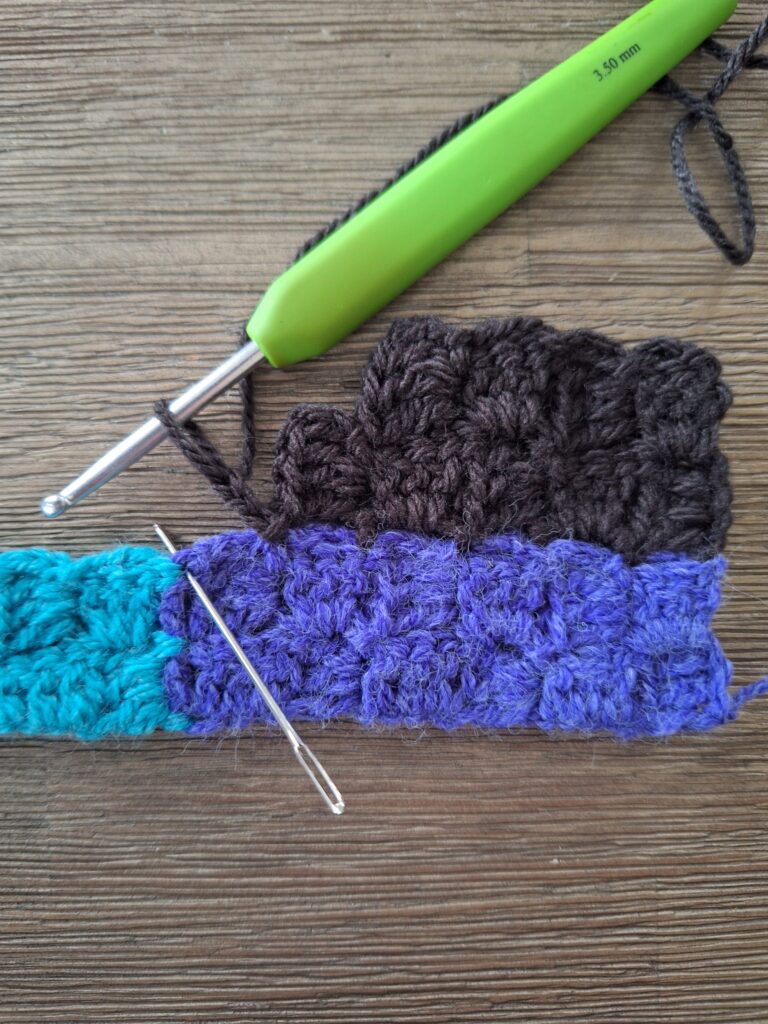
Chain 3, make 2 blocks
The term block is used here and throughout for a combination of (chain 3, 3 double crochet) that together make the block shape in the Corner to Corner stitch.
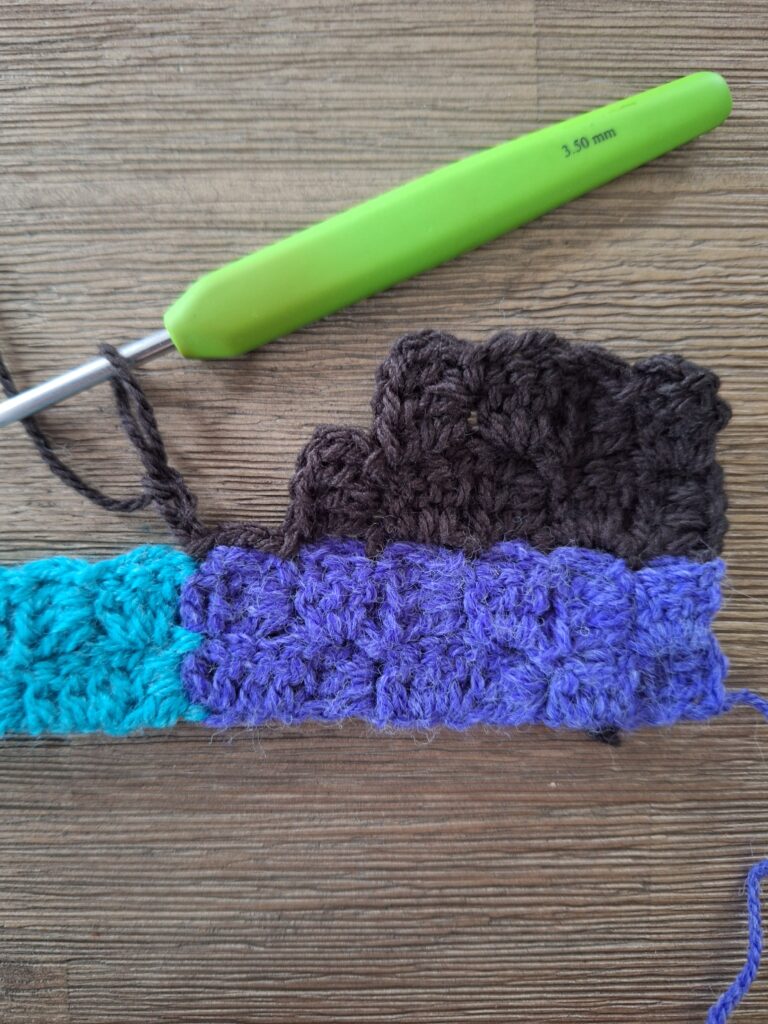
Carry on like you’ve done so far, keep making two blocks in each row.
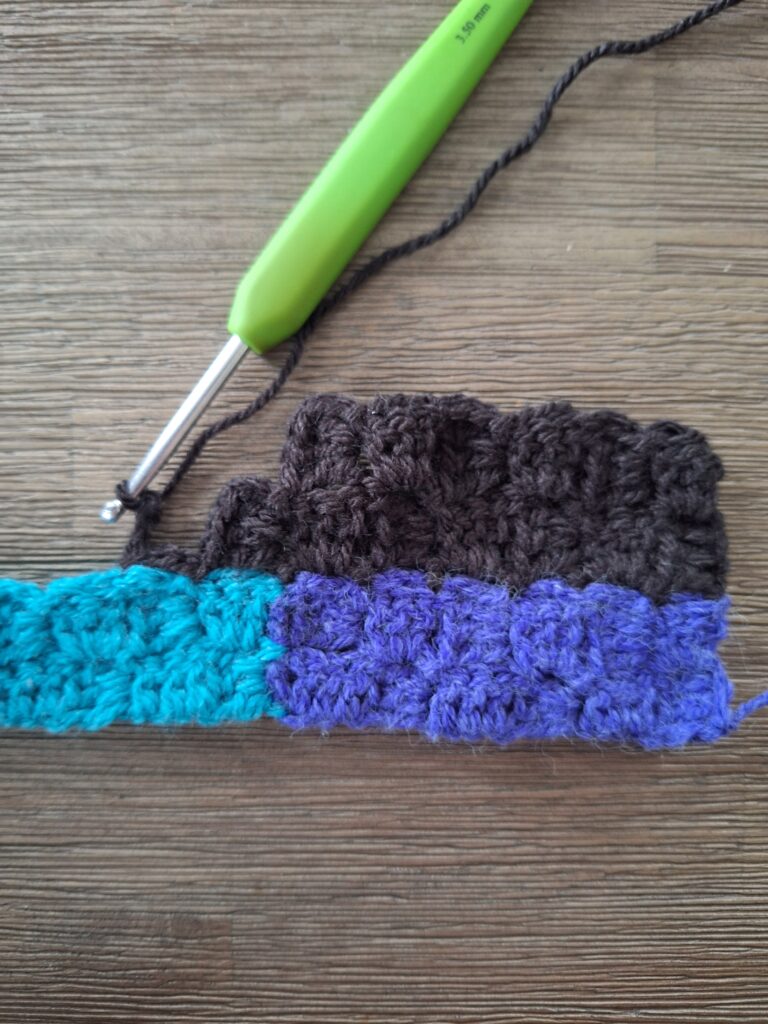
Your desired width here is 16 blocks wide and 2 blocks high. Chain 3, make 1 more block.
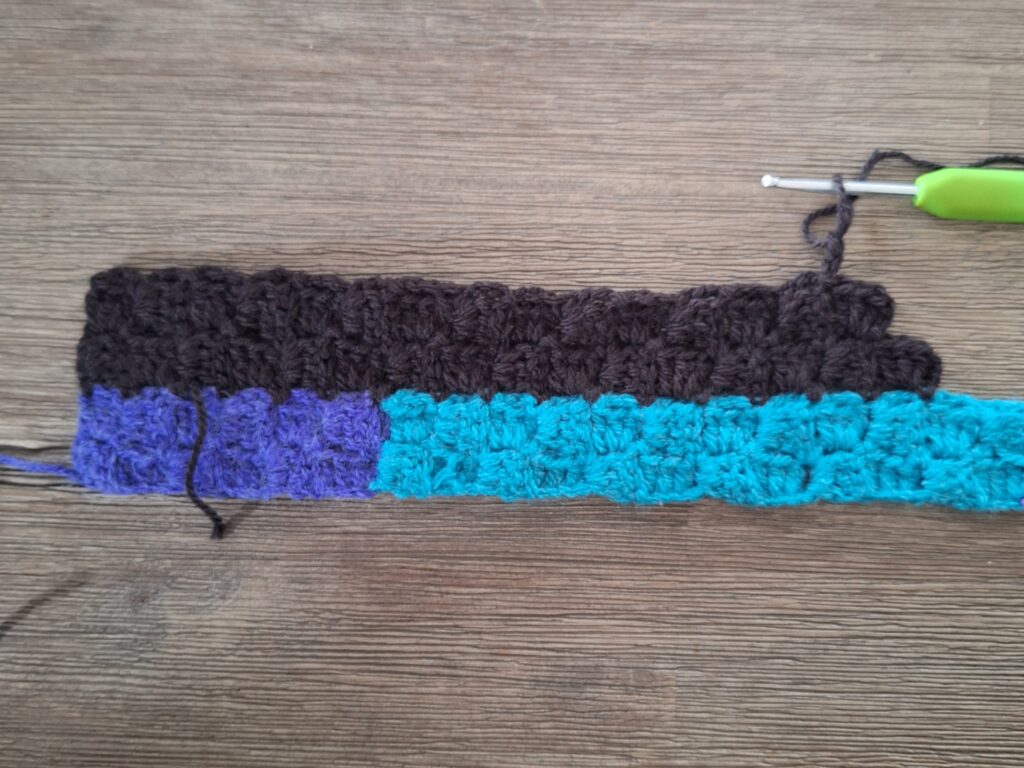
Make sure you end the panel in the corner. Fasten off.
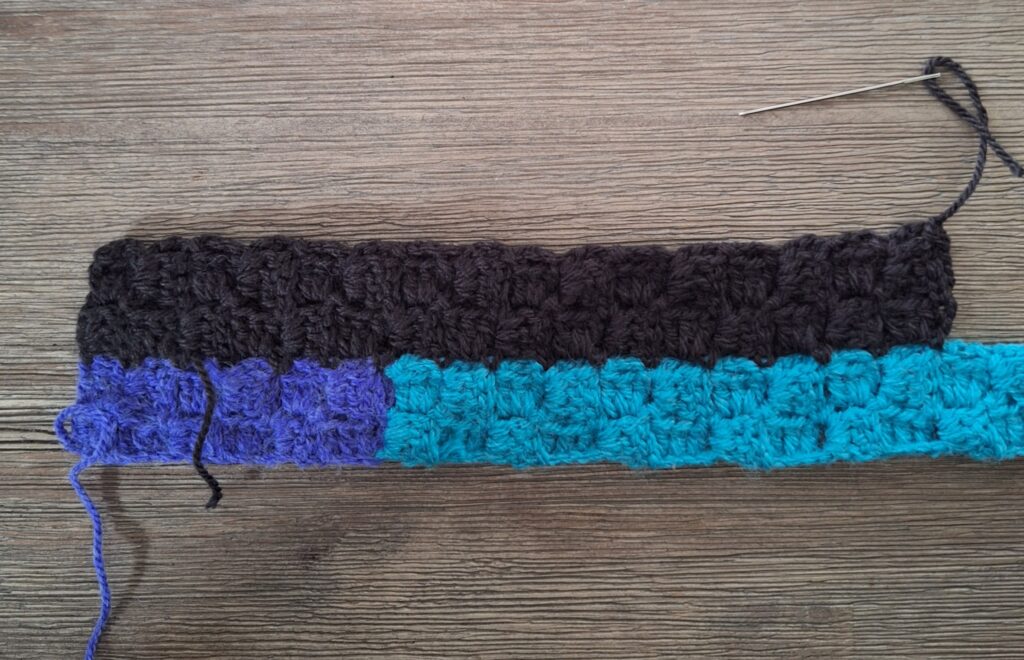
Strip 2 – Panel 2: 2 blocks high and 12 blocks wide; Colour F
This is the method to start with a horizontal block. You can tell that the blue block underneath the corner has vertical double crochet, which you view from the back. You want to make a block with horizontal double crochets that you view from the front for your first block here.
When you change colour, you attach into the same slip stitch as the last block of the previous panel (see needle in picture below):
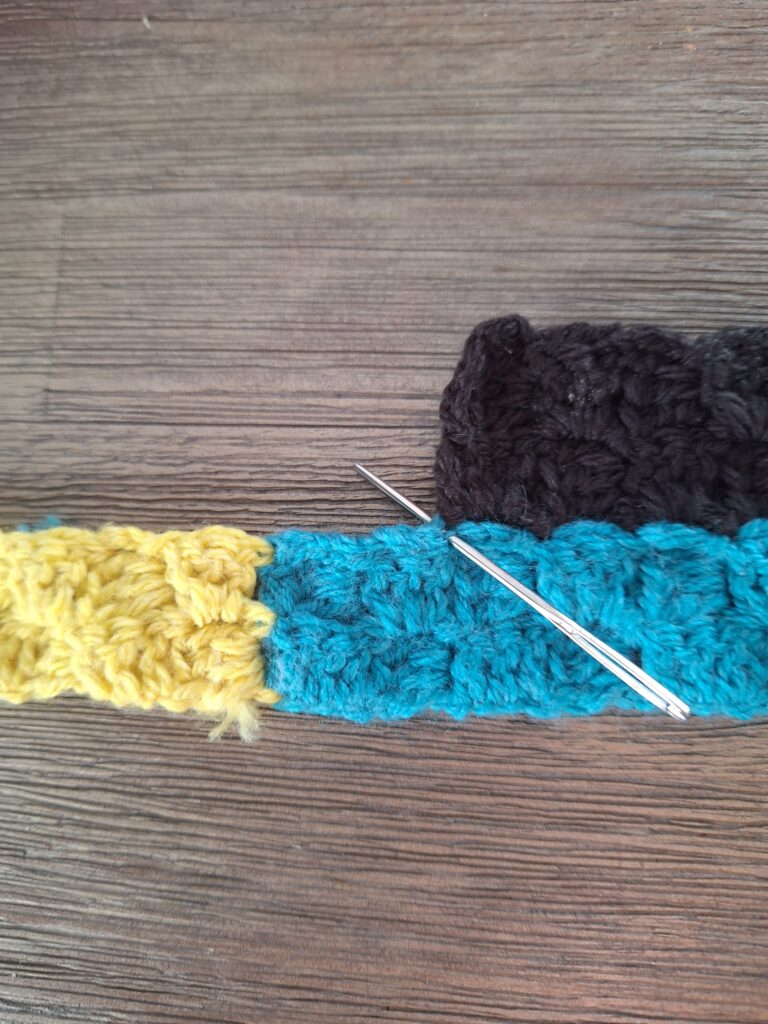
Pull the slip knot through to the front
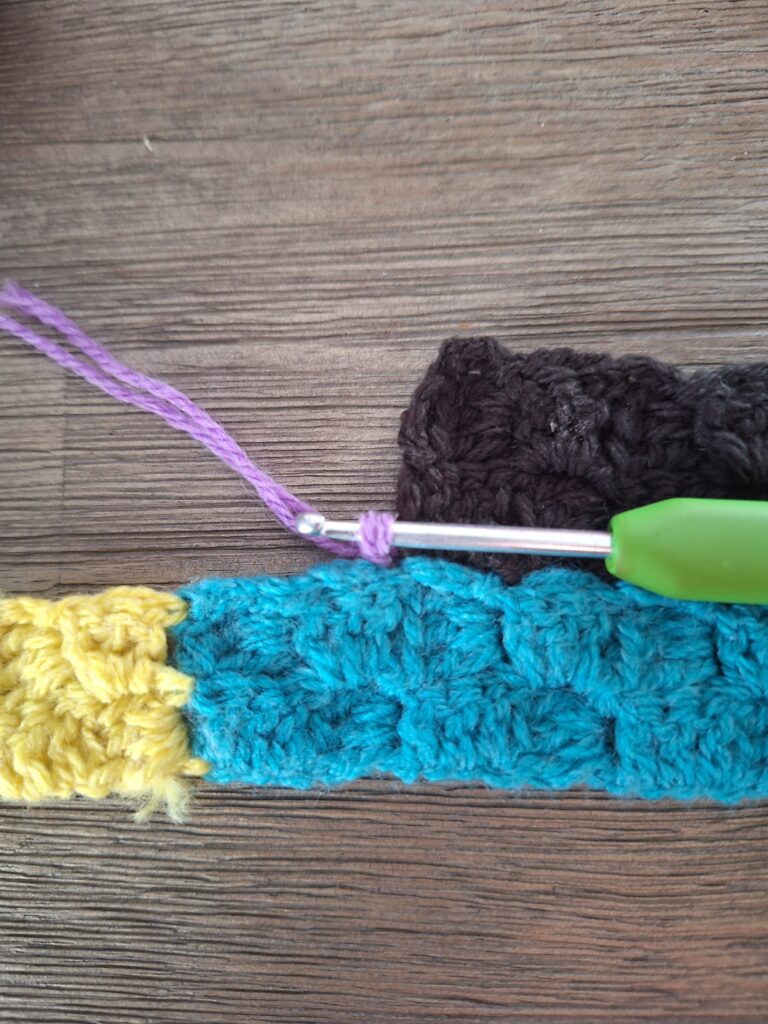
Chain 1 with double yarn and 2 chain with normal yarn, turn.
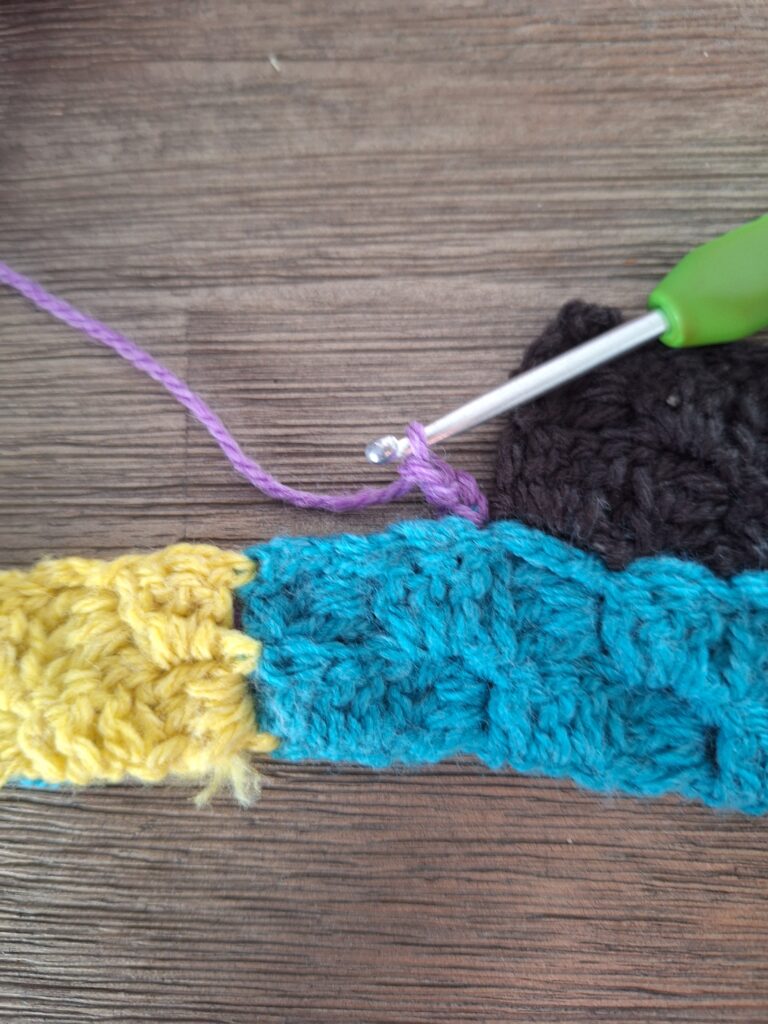
The block you’re going to make now is in opposite direction from the blocks beside and below it. Slip stitch into the slip stitch between two blocks (see needle in the picture below).
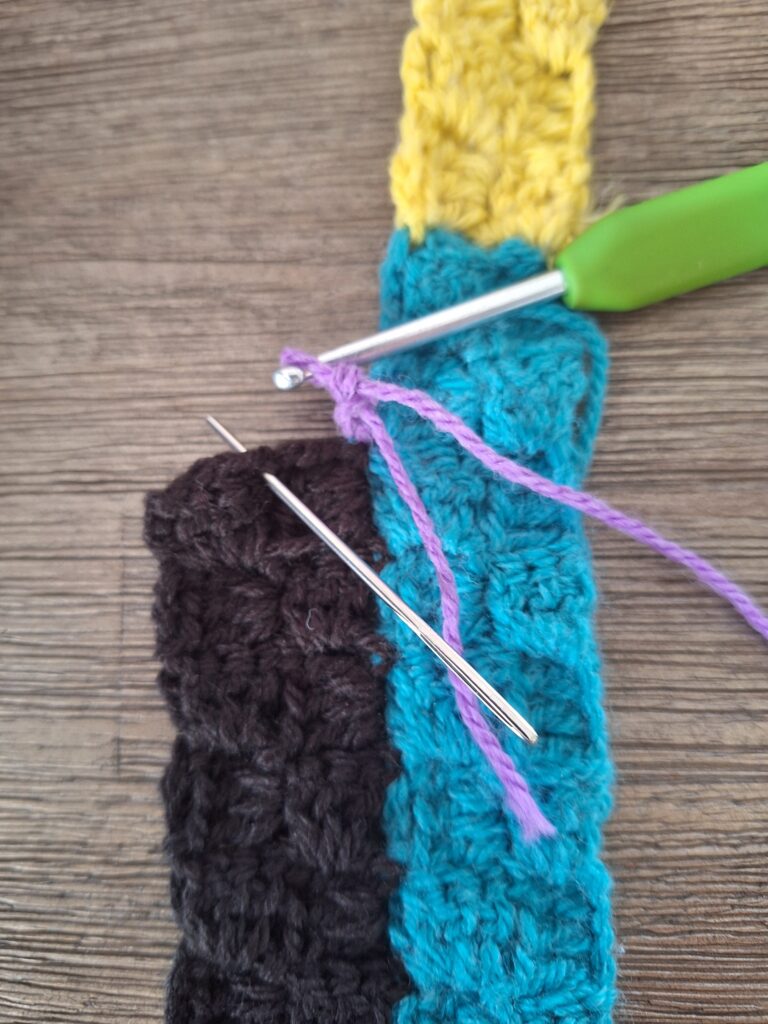
Chain 3, turn
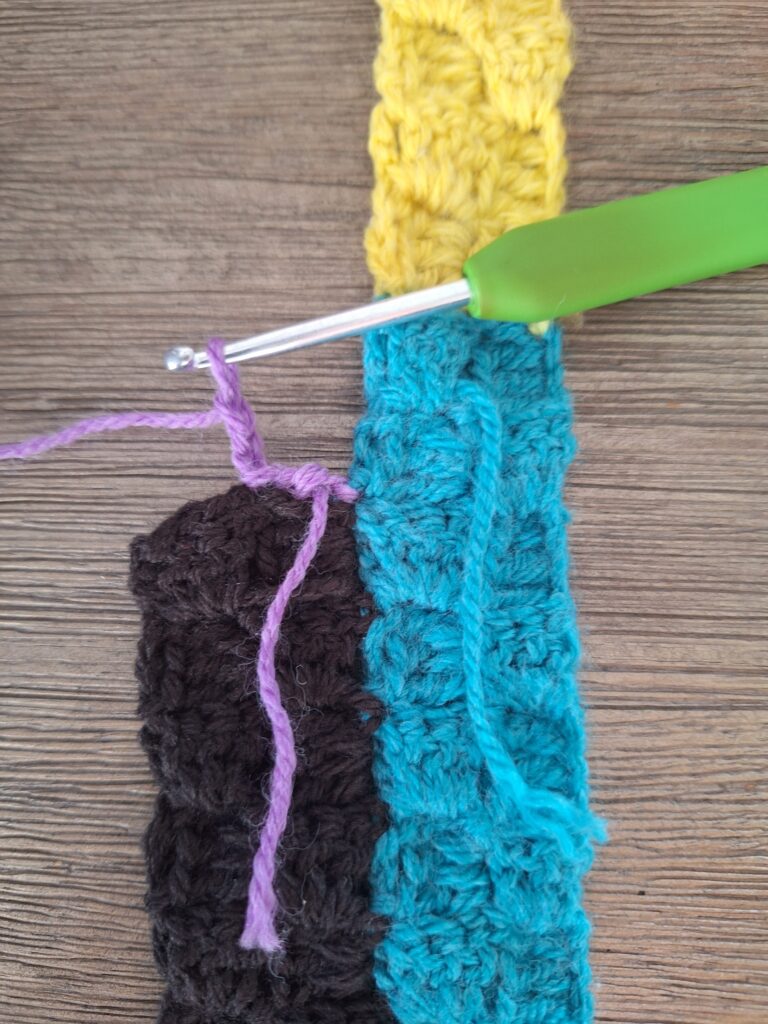
Make 3 double crochet into the chain space (see needle)
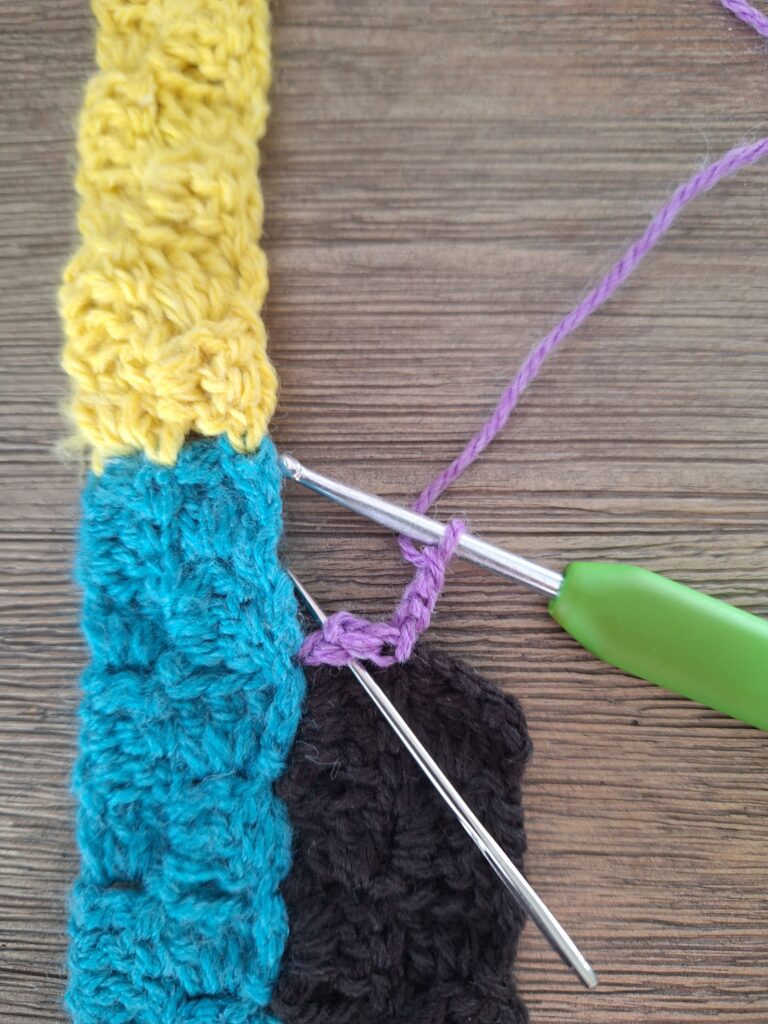
Slip stitch into slip stitch between the next two blocks of the previous strip (see needle in picture below)
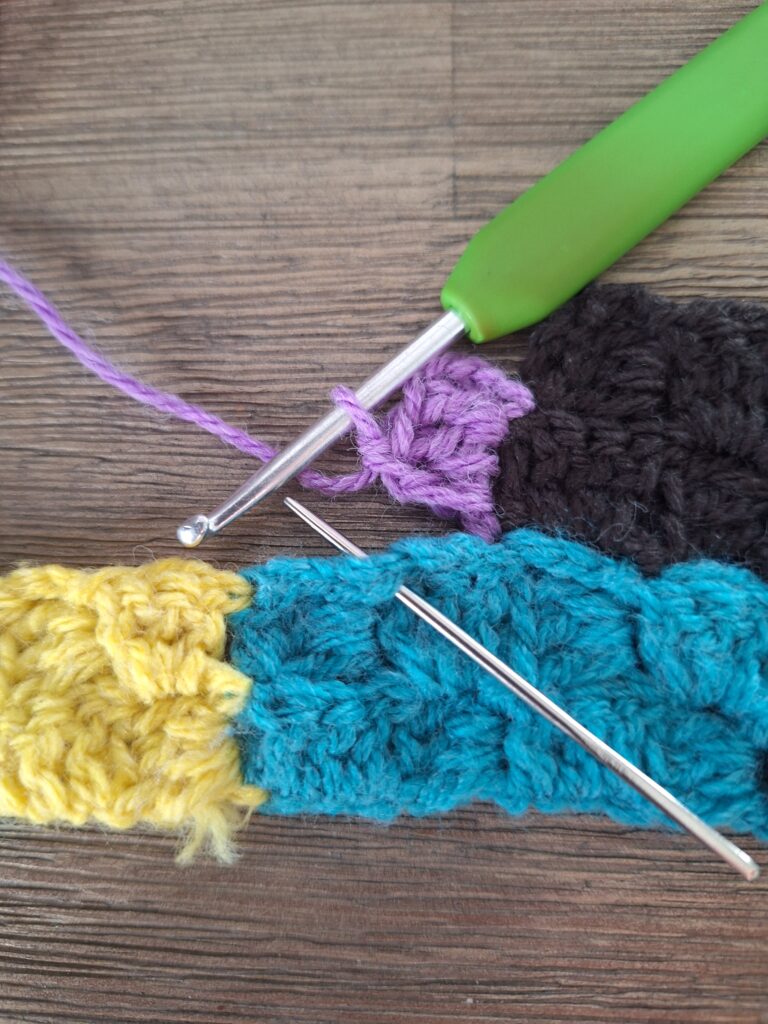
Chain 3, slip stitch into the slip stitch between the next 2 blocks (where you also attached the previous colour; see needle in picture below)
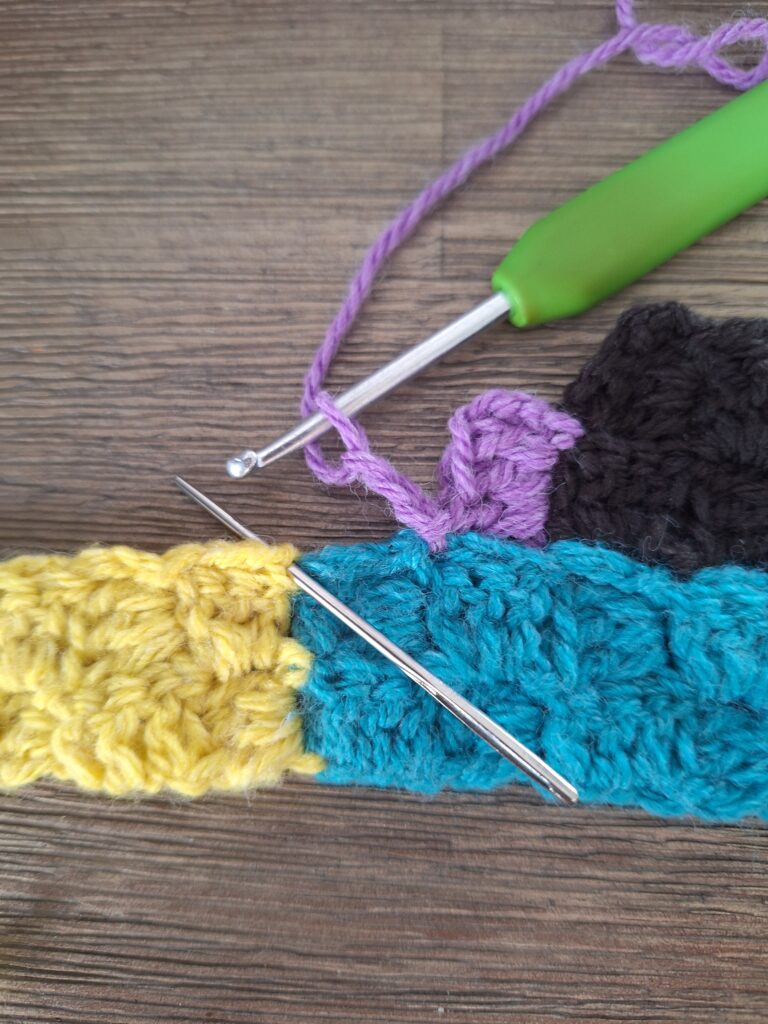
Chain 3, turn
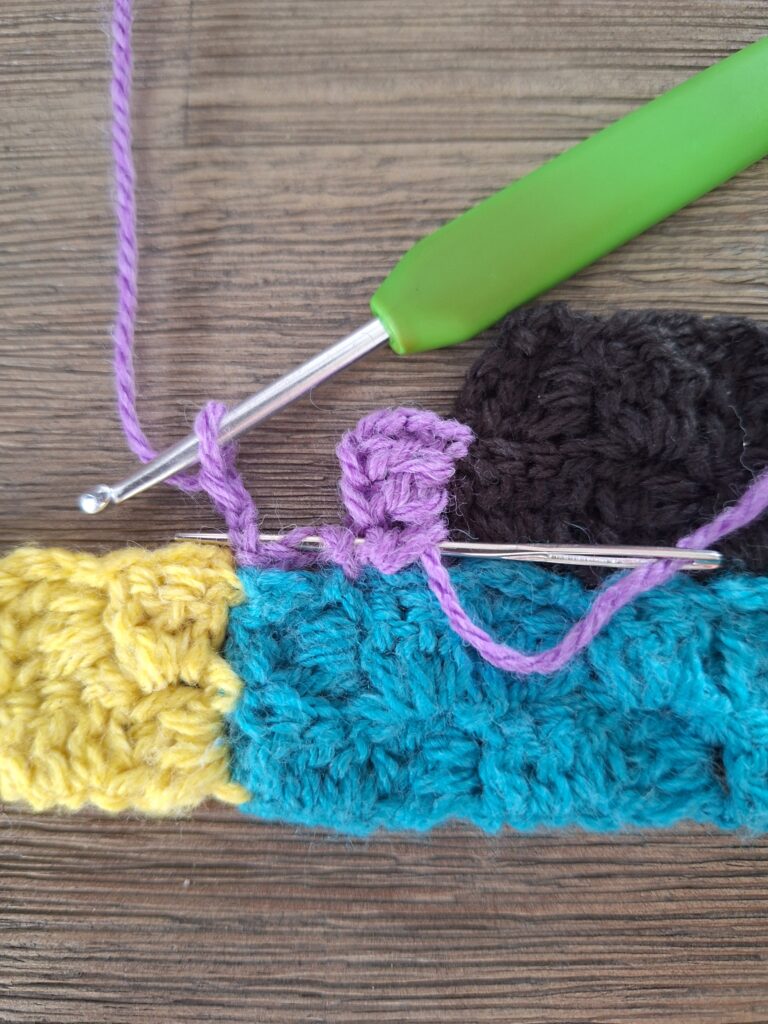
Make 2 blocks, followed by chain 3
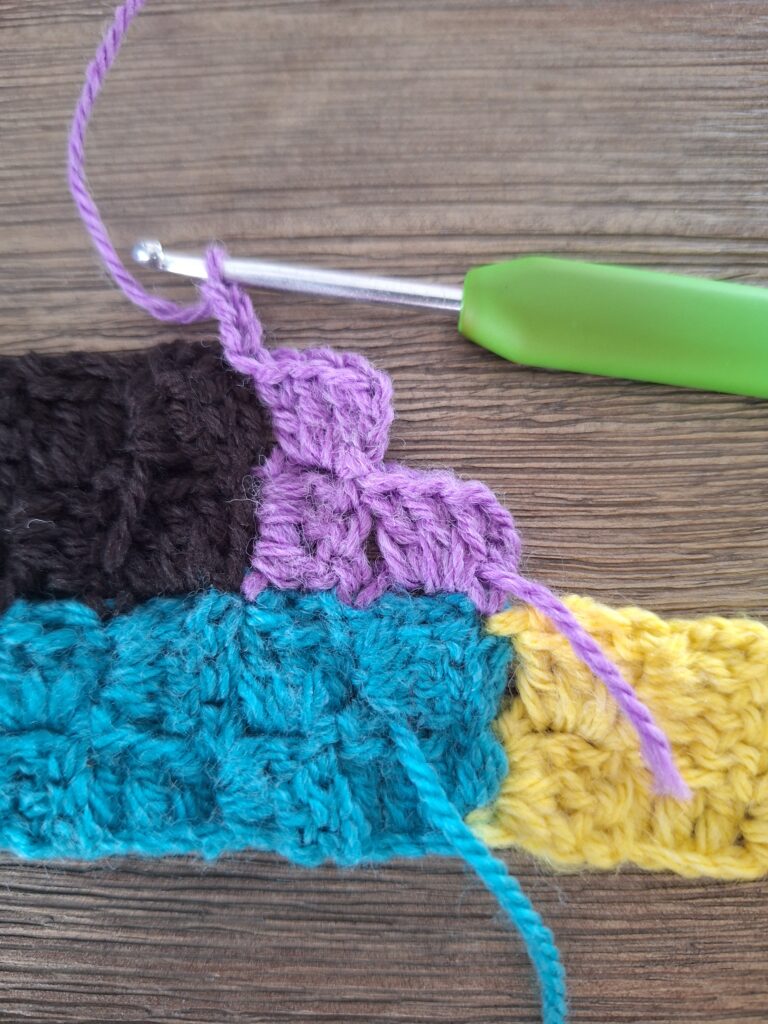
Slip stitch into the chain space of the same block, chain 3, make two blocks.
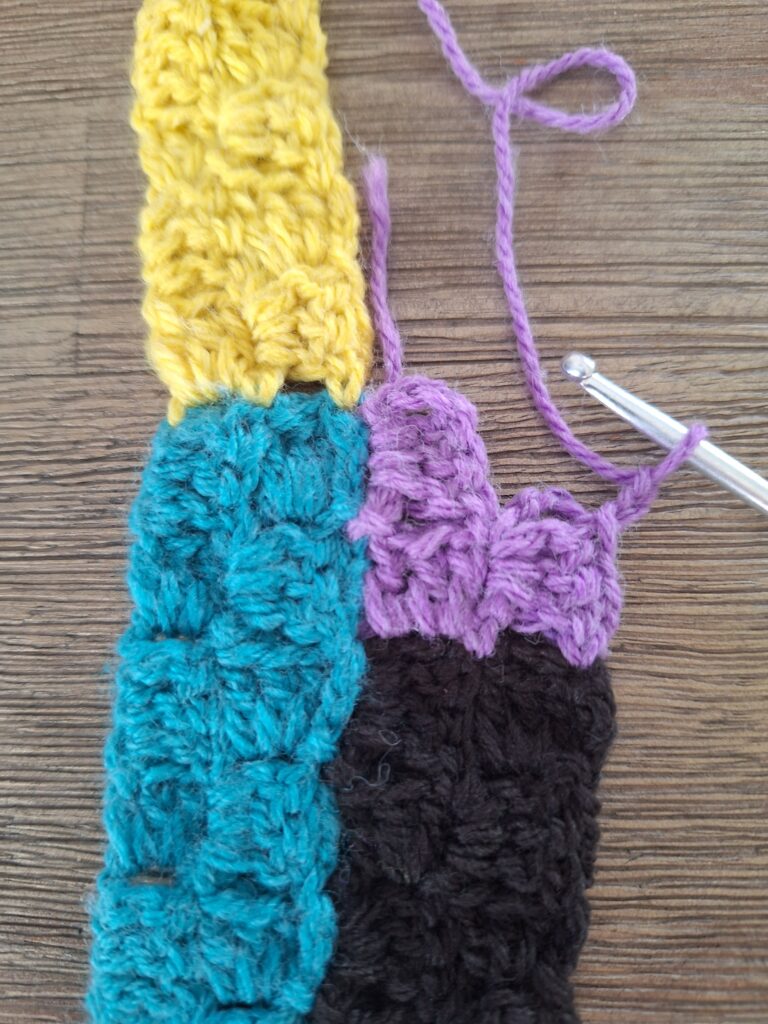
Slip stitch into the slip stitch between the next 2 blocks, chain 3, slip stitch into the slip stitch between the next 2 blocks, chain 3, turn.
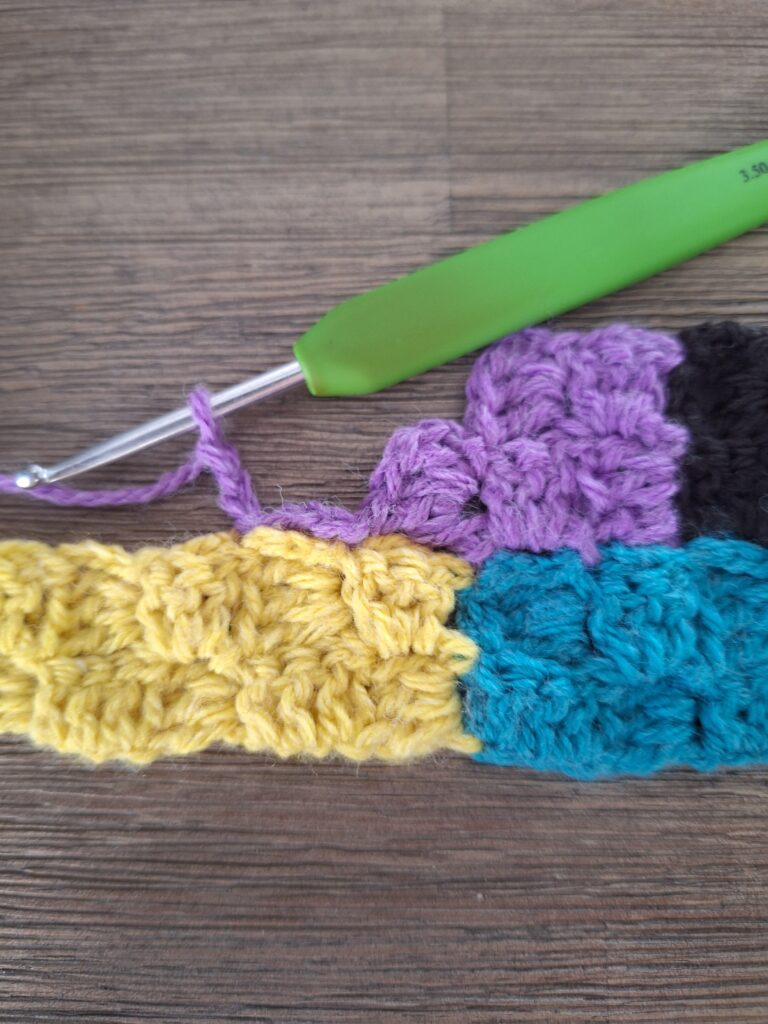
Carry on. This panel is 12 blocks wide and 2 blocks high.
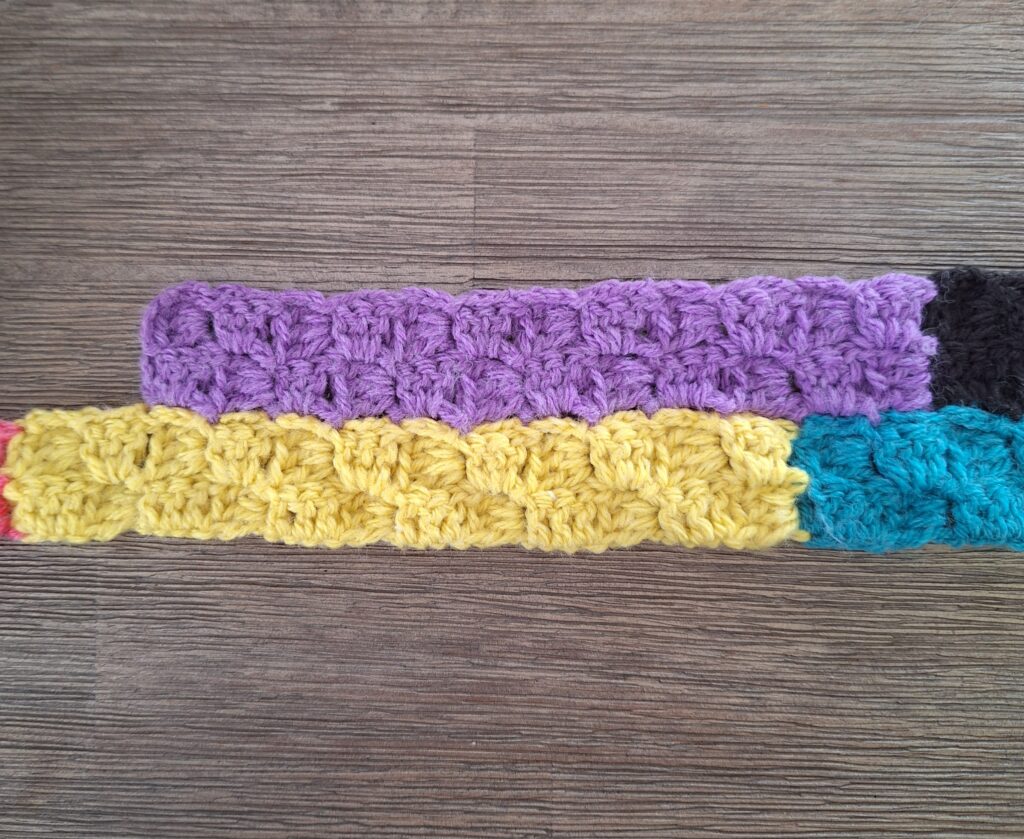
Strip 2 – Panel 3: 2 blocks high, 12 blocks wide; Colour G
For the change of colour, continue crocheting in the same way as before. You will now see that there is again a block with vertical double crochets, which you see from the back, directly under the block you want to make now. So you want to make a block with horizontal double crochets that you see from the front. To do this, you work in exactly the same way as for strip 2 – panel 2.
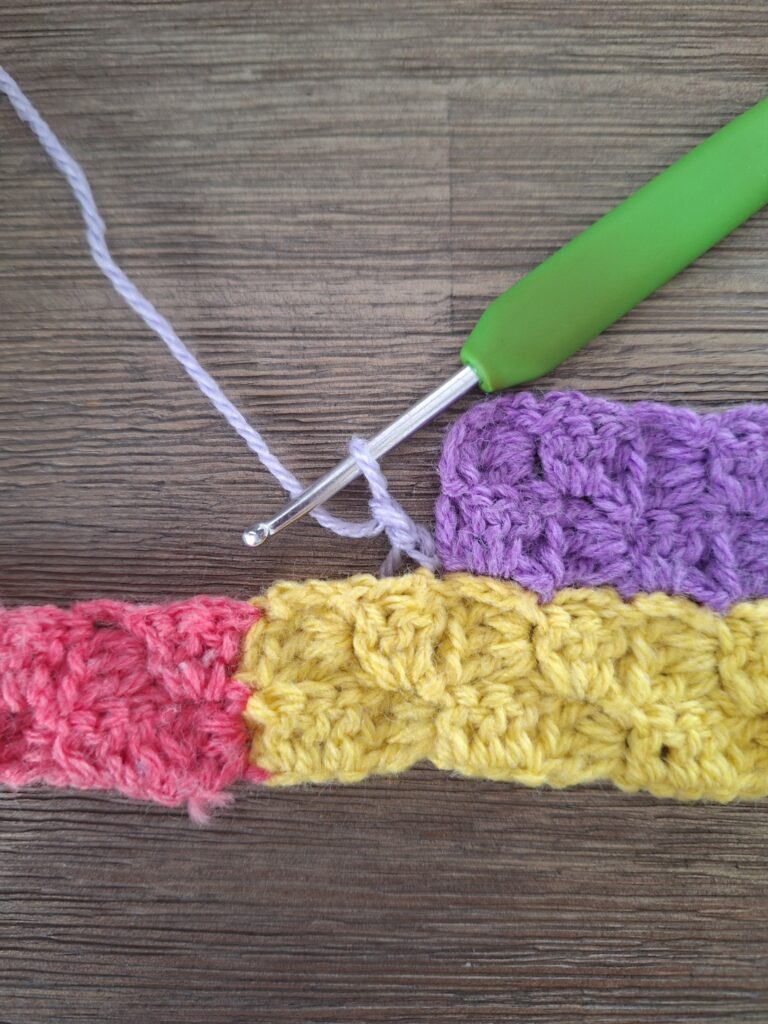
Strip 2 – Panel 4: 2 blocks high and 12 blocks wide; Colour H
Here the colour change is the same again. You start with a block with horizontal double crochet. Please check if that’s the same for you and make a panel of 2 by 12 blocks.
Strip 2 – Panel 5: 2 blocks high and 6 blocks wide; Colour E
Attach the last colour in the same way. Please count your blocks: panel 5 should have 6 blocks in Colour E.
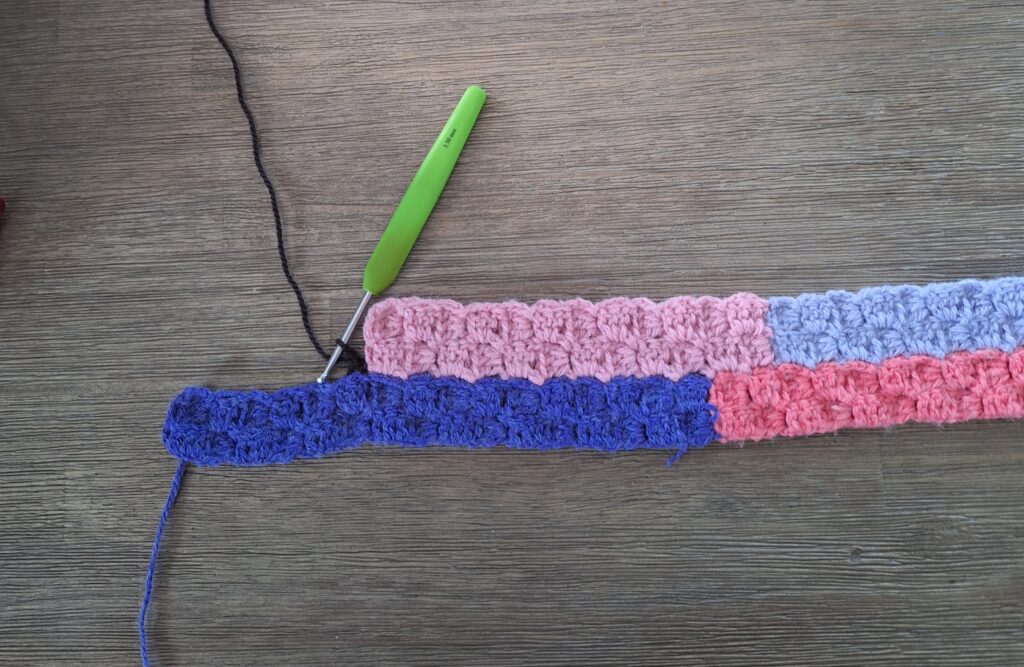
Strip 2 is finished and this is what it looks like!
Strip 3
Strip 3 – Panel 1: 2 blocks high and 6 blocks wide; Colour A
Start in the same way as how you started strip 2. This strip has the exact same widths and colours as strip 1, but you attach it to strip 2.
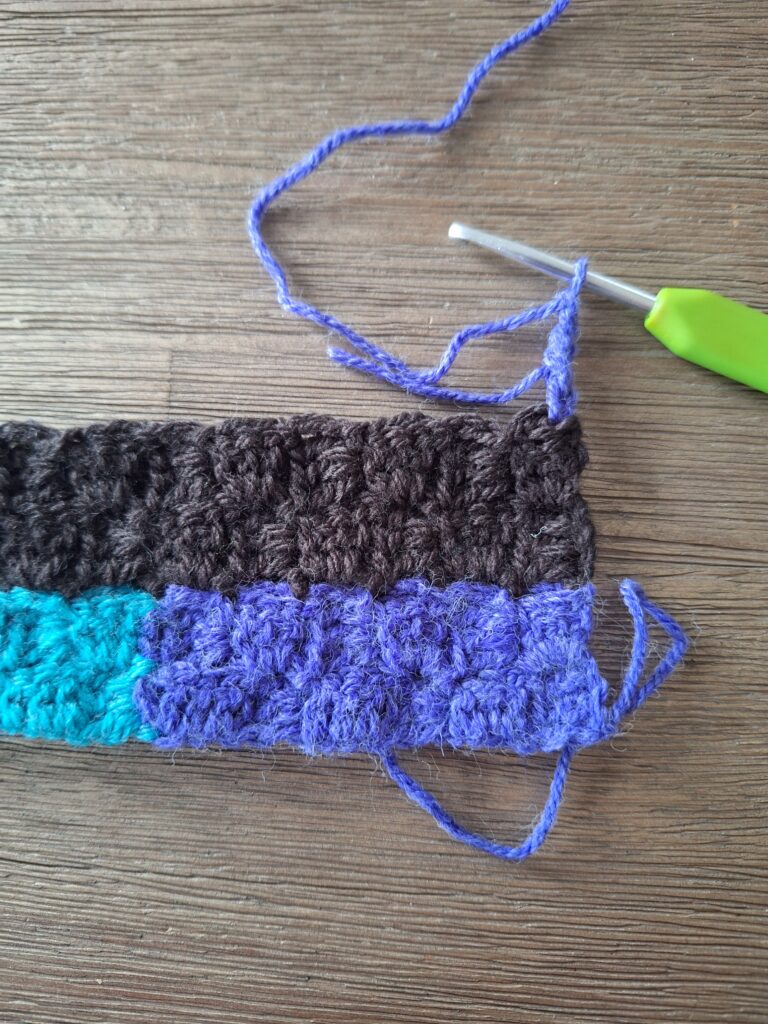
Please be mindful when you change colors, of the direction of your blocks.
Strip 3 – Panel 2: 2 blocks high and 12 blocks wide; Colour B
You can tell that the block you need to make has horizontal double crochets, because the block beneath and beside it both have vertical double crochets, shown from the back. You first block has to have horizontal double crochets again.
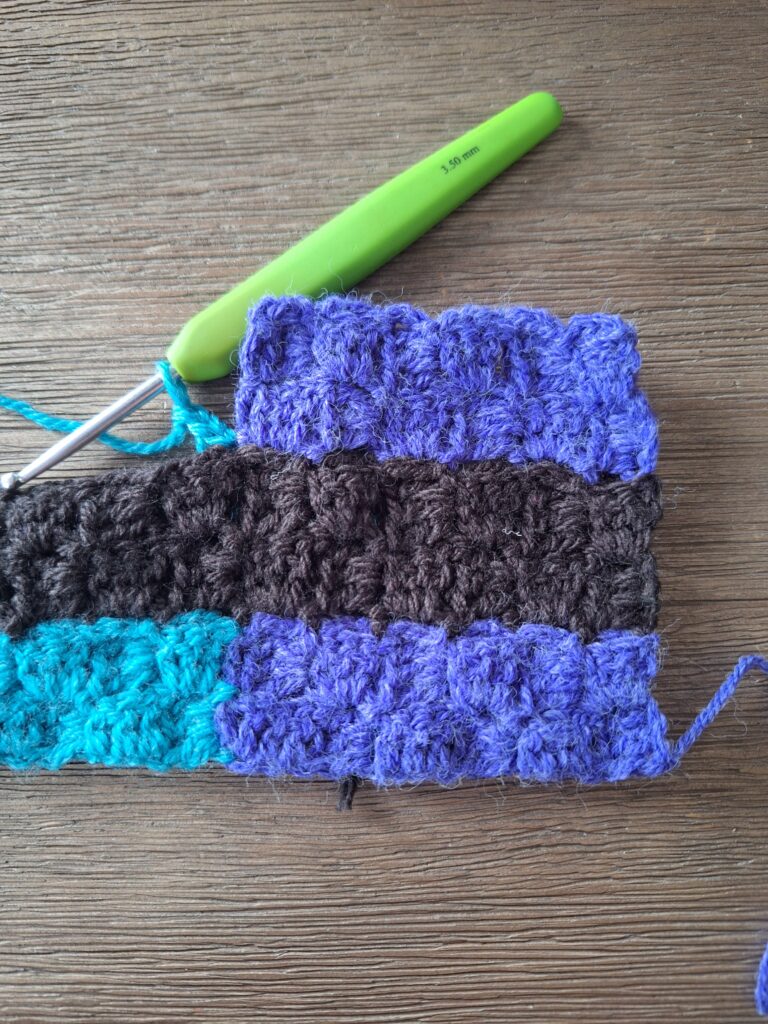
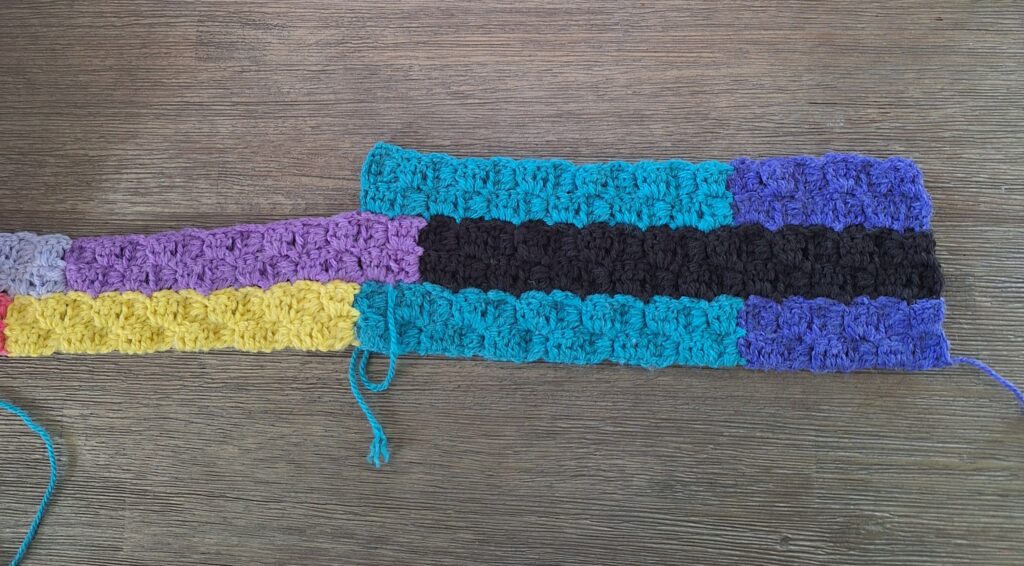
Strip 3 – Panel 3-4: 2 blocks high and 12 blocks wide; Colour C and then Colour D
Keep paying attention to the orientation of your first block, then the other blocks will automatically come out right. Make it a habit to pay attention to the orientation of the blocks after each color change: are they exactly opposite to their direct neighbors? And exactly the same as the diagonals? Great!
Strip 3 – Panel 5: 2 blocks high and 16 blocks wide; Colour A
Your final panel in this strip is a long one again: 16 blocks wide in Colour A.
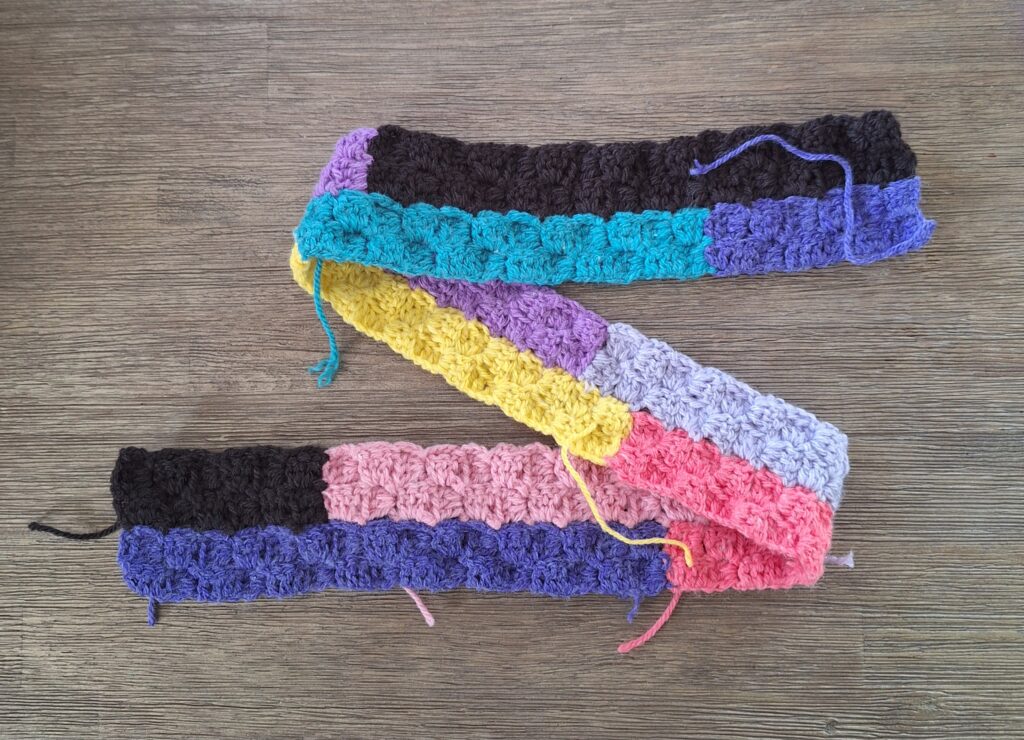
Strip 3 is finished and this is how it looks:
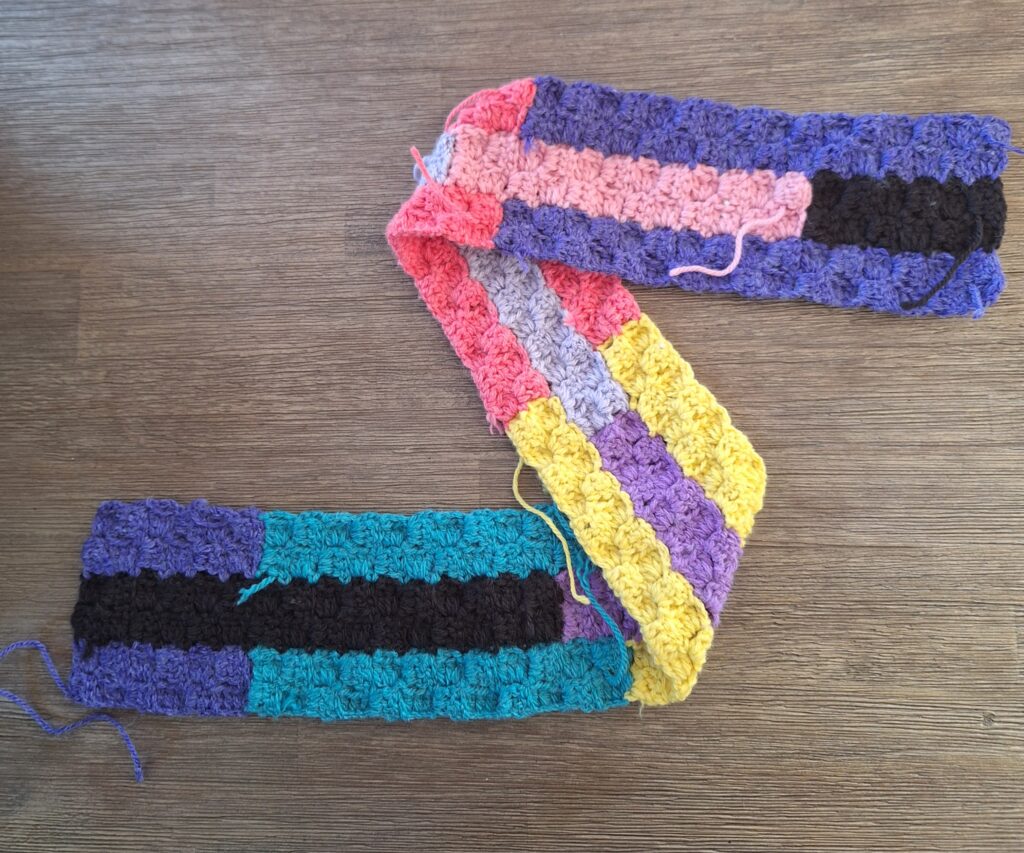
Strip 4
This whole strip is made in the exact same manner as strip 2.
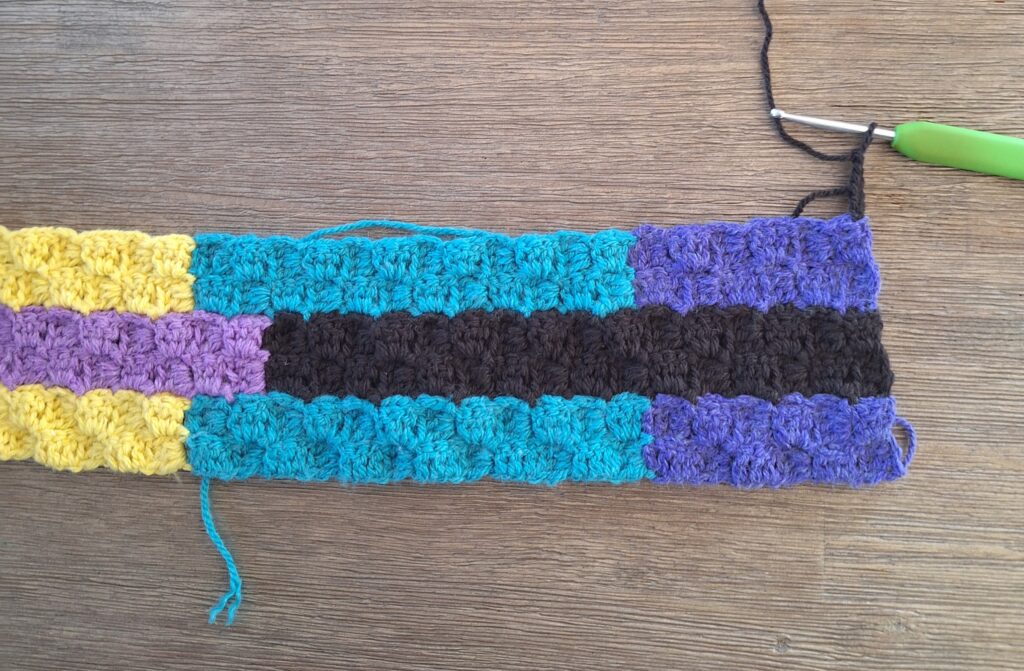
This is what your work should look like now:
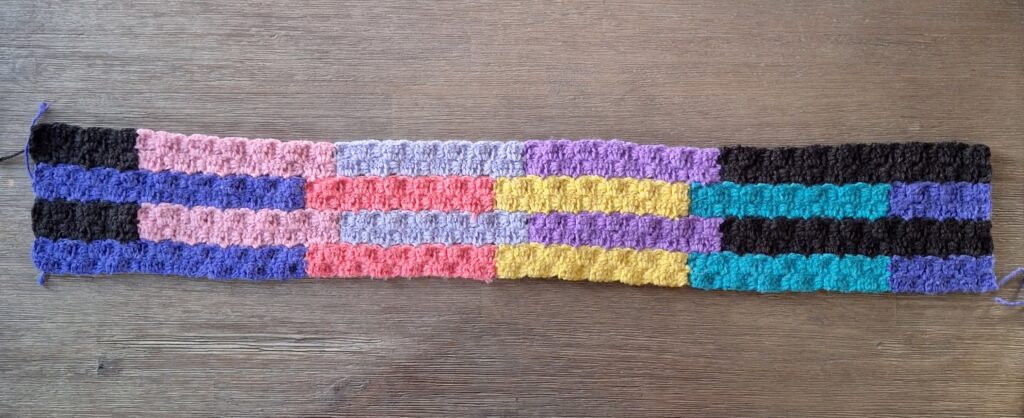
Strip 5
Attach like for strips 2, 3 and 4, but be careful: the block is wider than the previous first panels of this colour set. 7 blocks wide, not 6.
We’re going to learn how to start a panel with vertical double crochet. After you’ve learned this (and darning these type of panels af), you’ll be ready to finish this week!
Strip 5 – Panel 1: 2 blocks high and 7 wide: Colour A
Crochet in the same way as strip 3, but keep in mind that the colors shift here. After crocheting 7 by 2 blocks, you still need to fasten off. To do this, chain 3.
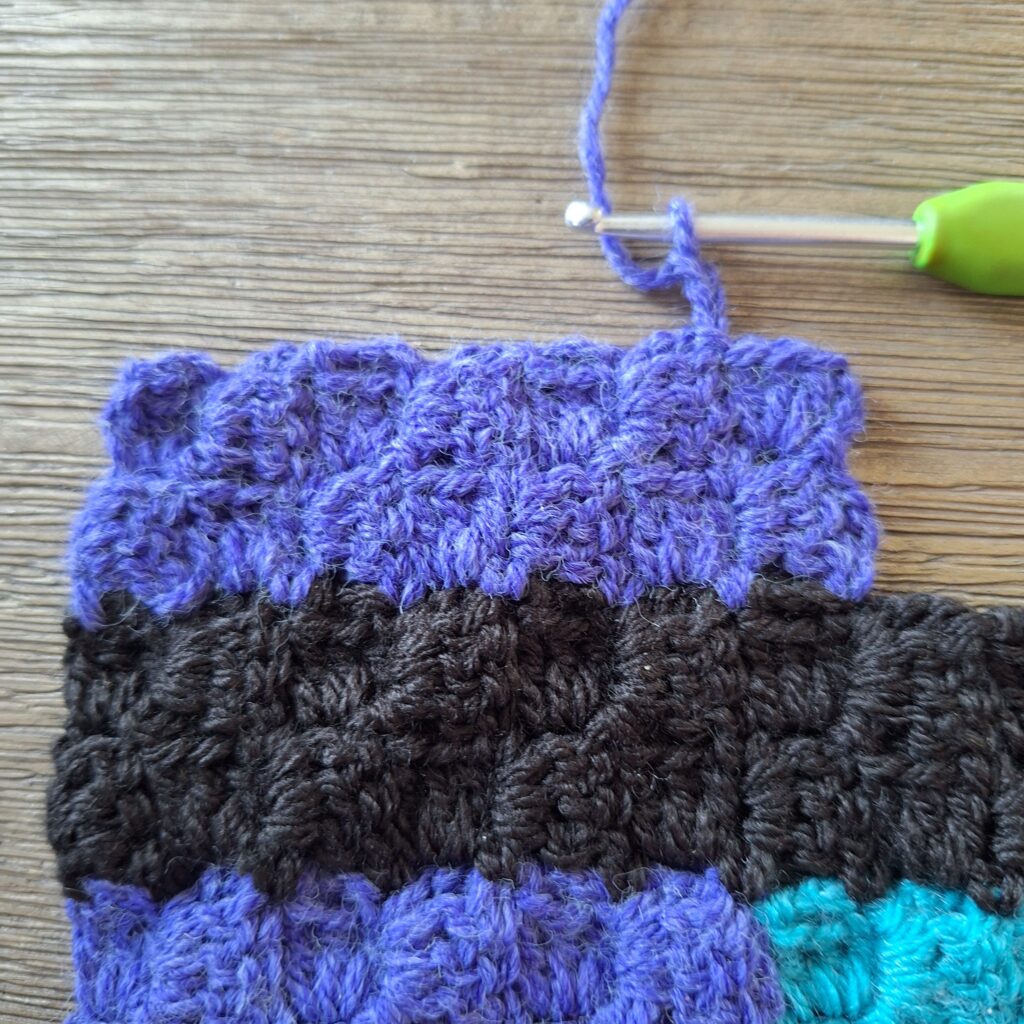
Slip stitch in chain space in the corner.
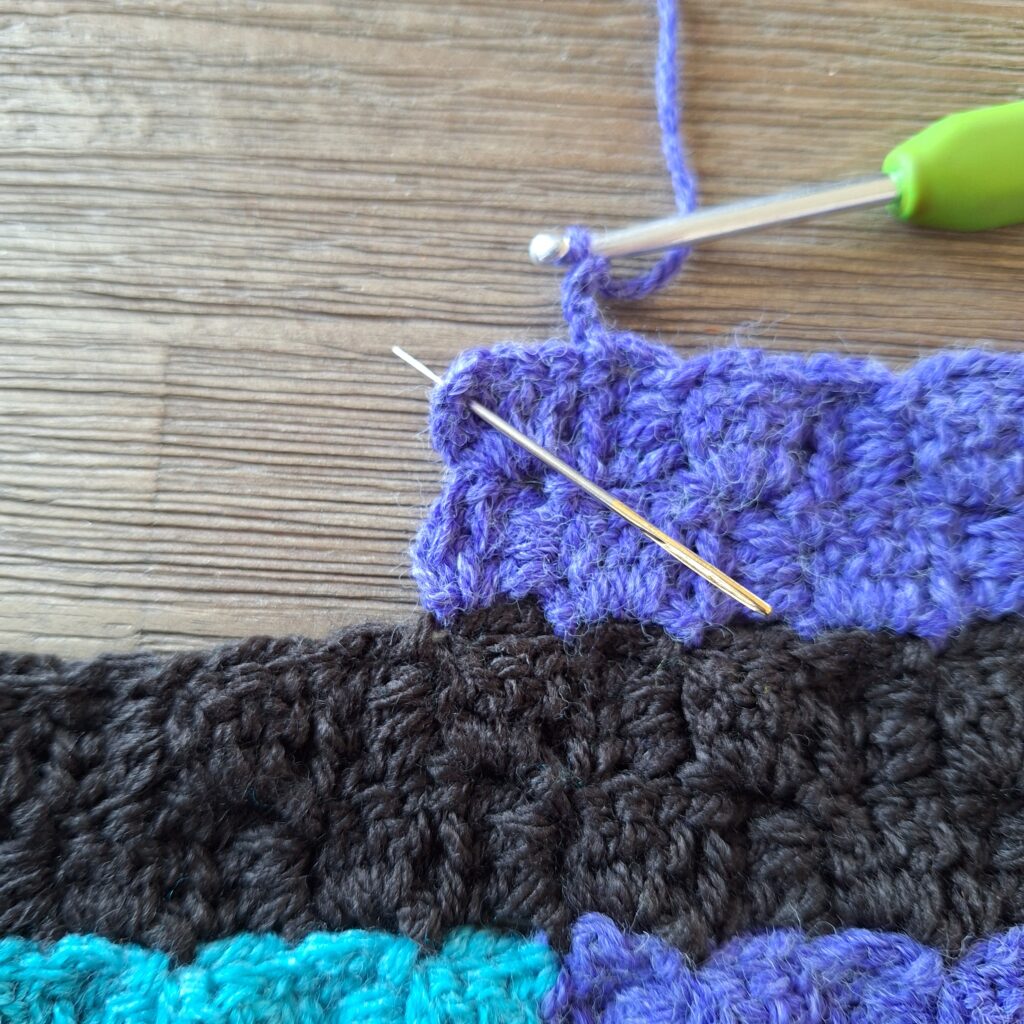
Chain 1, cut the yarn and pull through. Use a tapestry needle and weave through the side to secure.
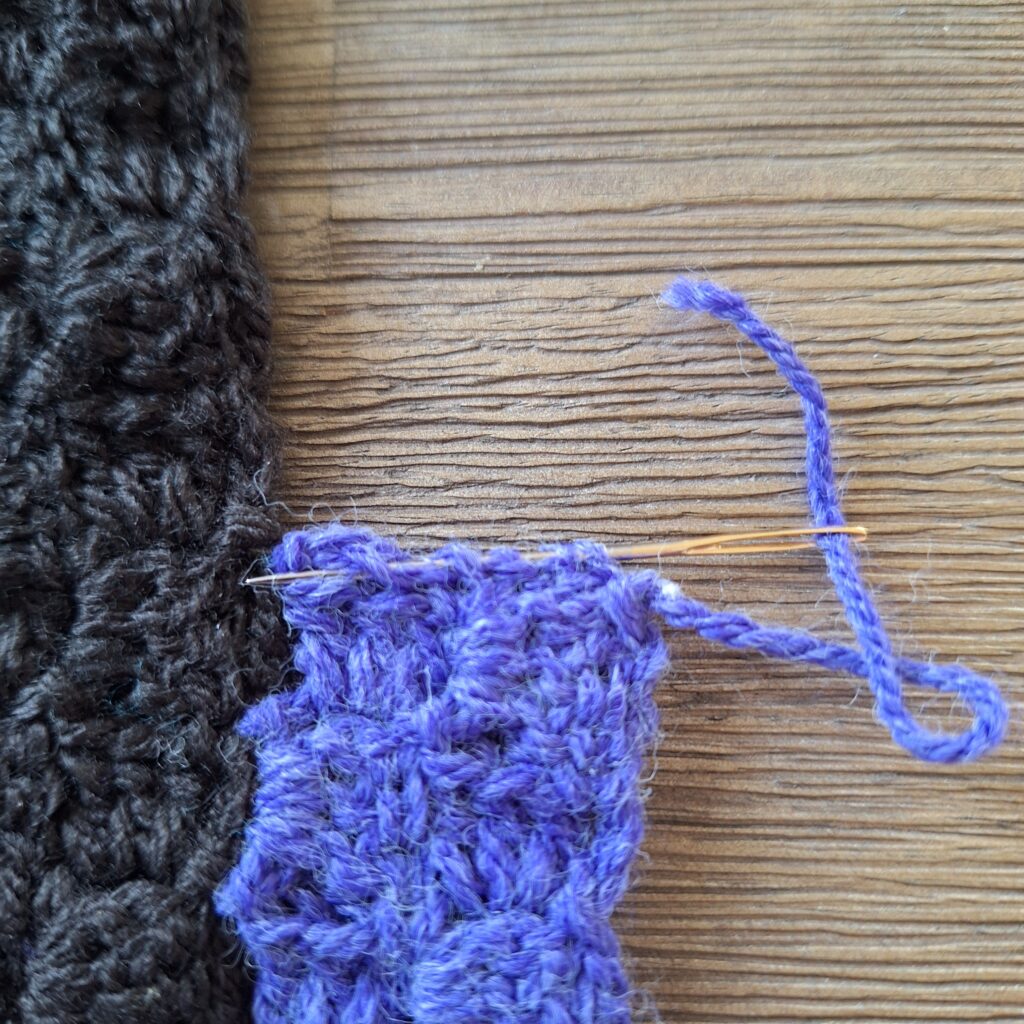
Then pull the yarn through the bottom of the double crochets, now you can cut the yarn and your panel is finished.
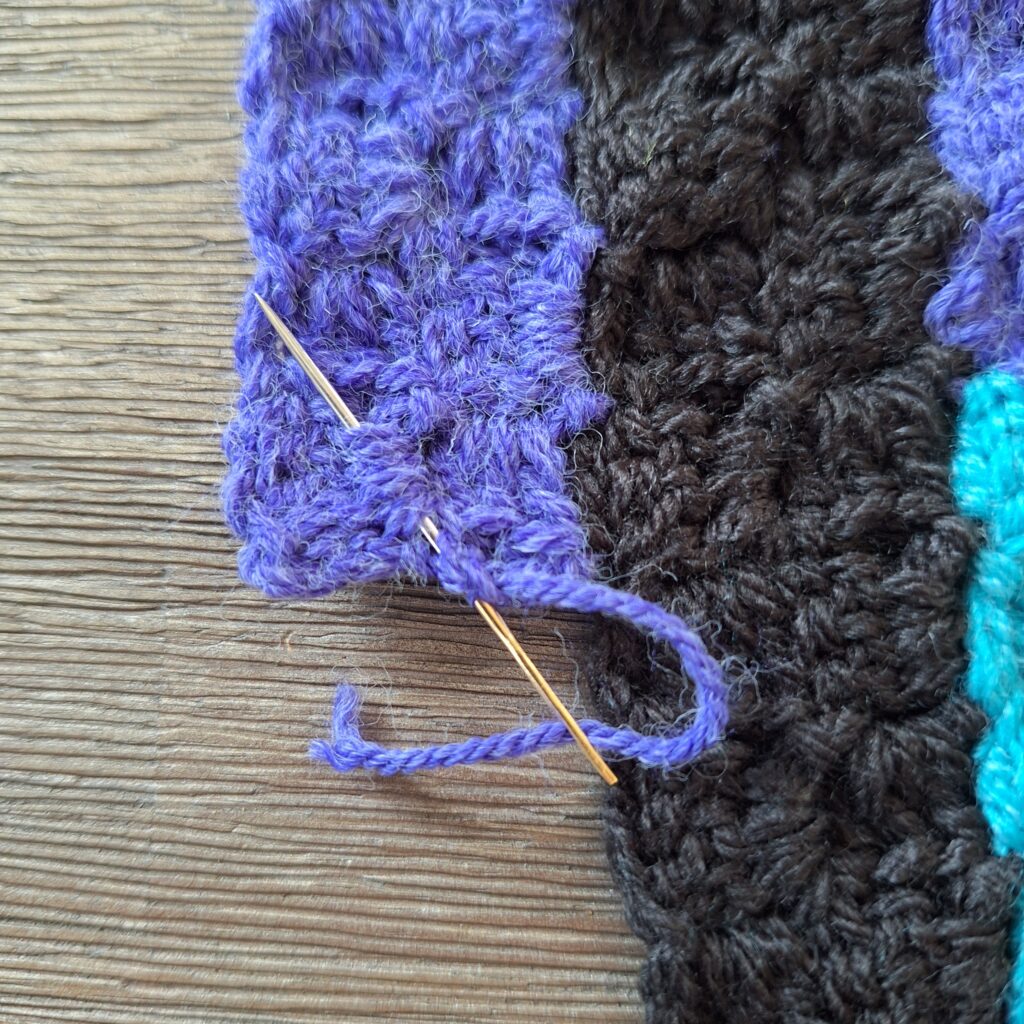
Tadah!
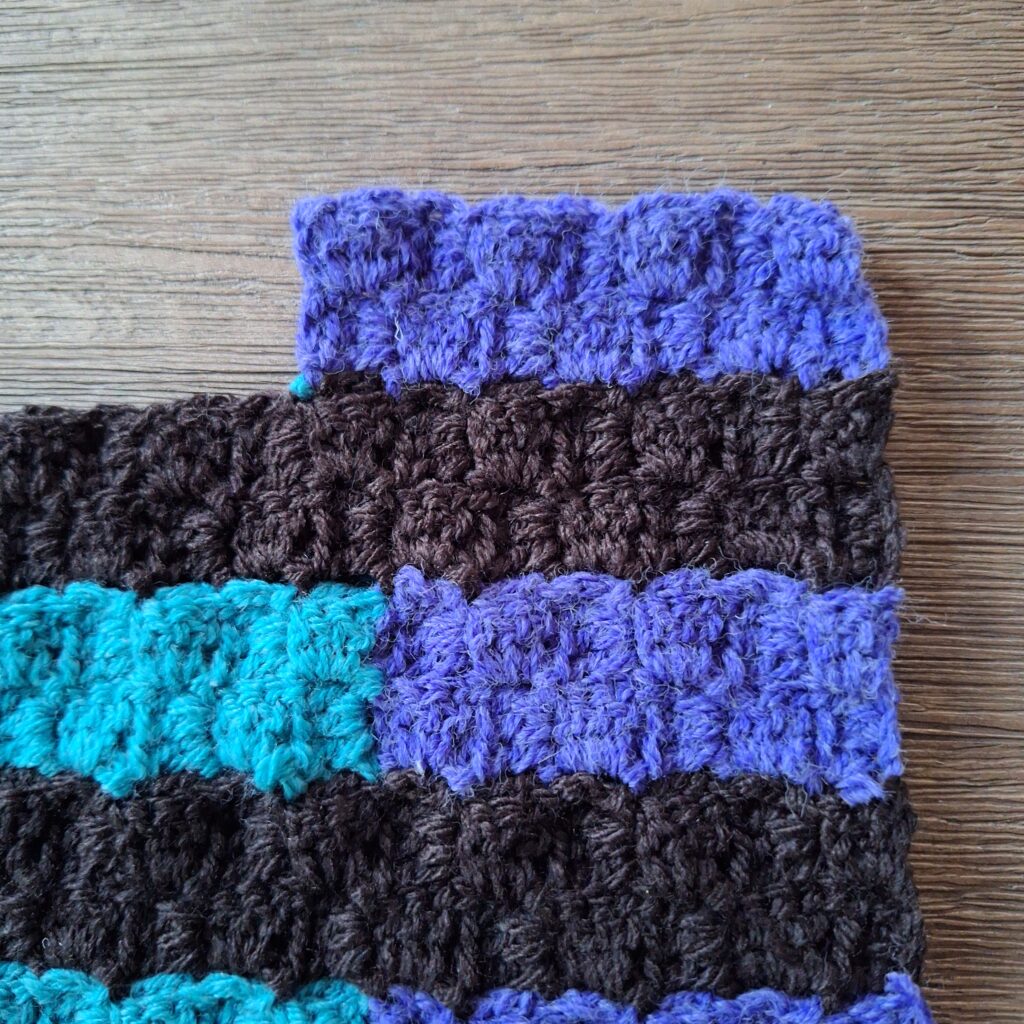
Strip 5 – Panel 2: 2 blocks high and 12 wide: Colour B
Color change. Join with a slip stitch in the corner between strip 4 and panel 1 of strip 5. You will see that the squares below and next to the new block you want to crochet have horizontal double crochets. So now we are going to do something new. Chain 3, then crochet a slip stitch in the slip stitch between 2 blocks of the previous strip (and not “up” on the previous panel; see darning needle).
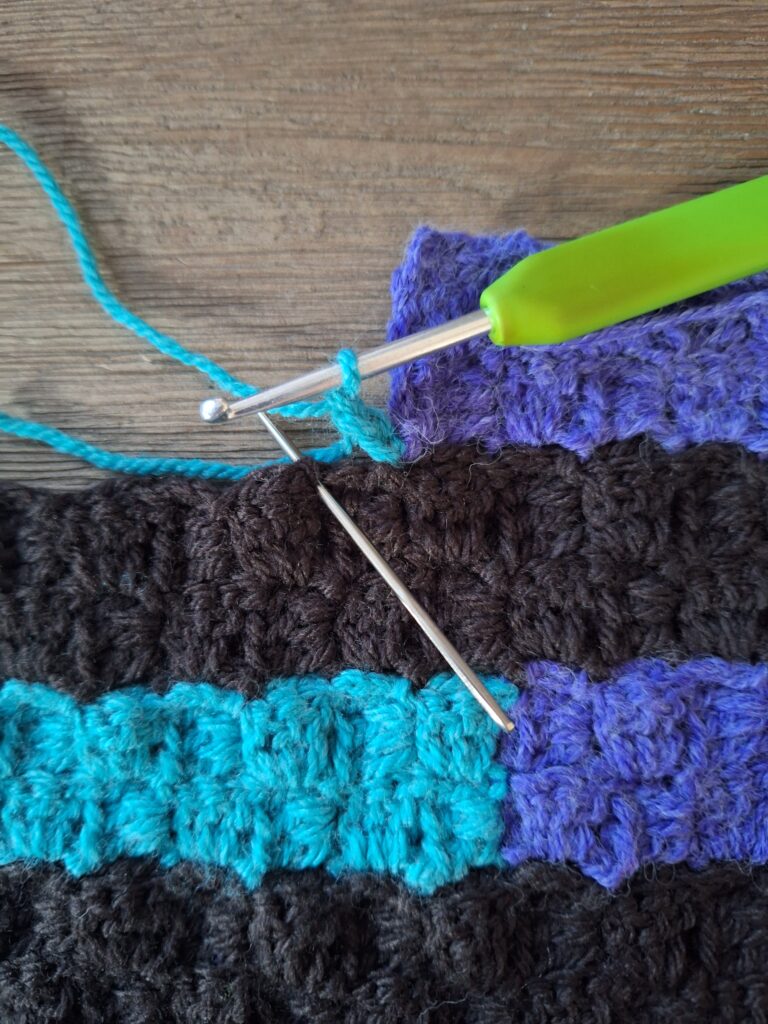
Chain 3
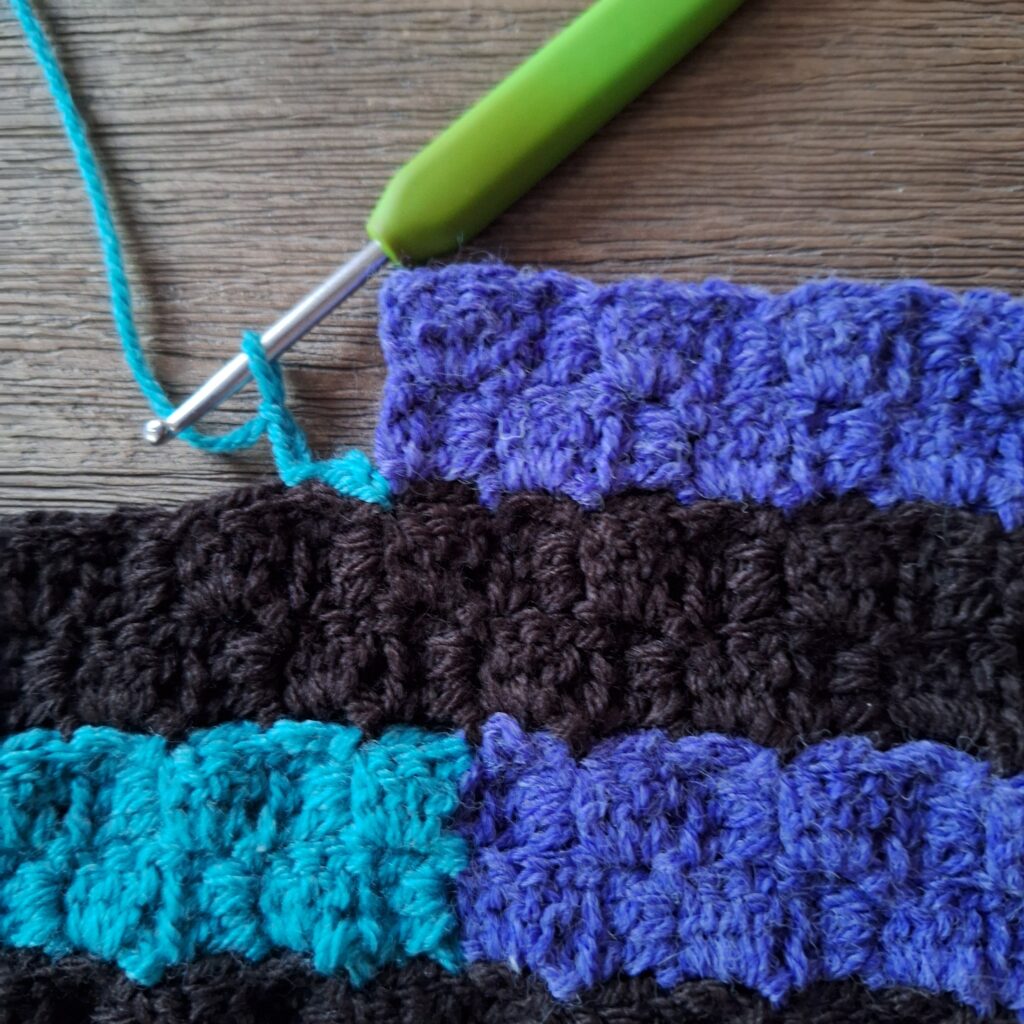
Turn your work, make 3 double crochet into the chain space you just made. Slip stitch in between two blocks of strip 5, panel 1 (see needle).
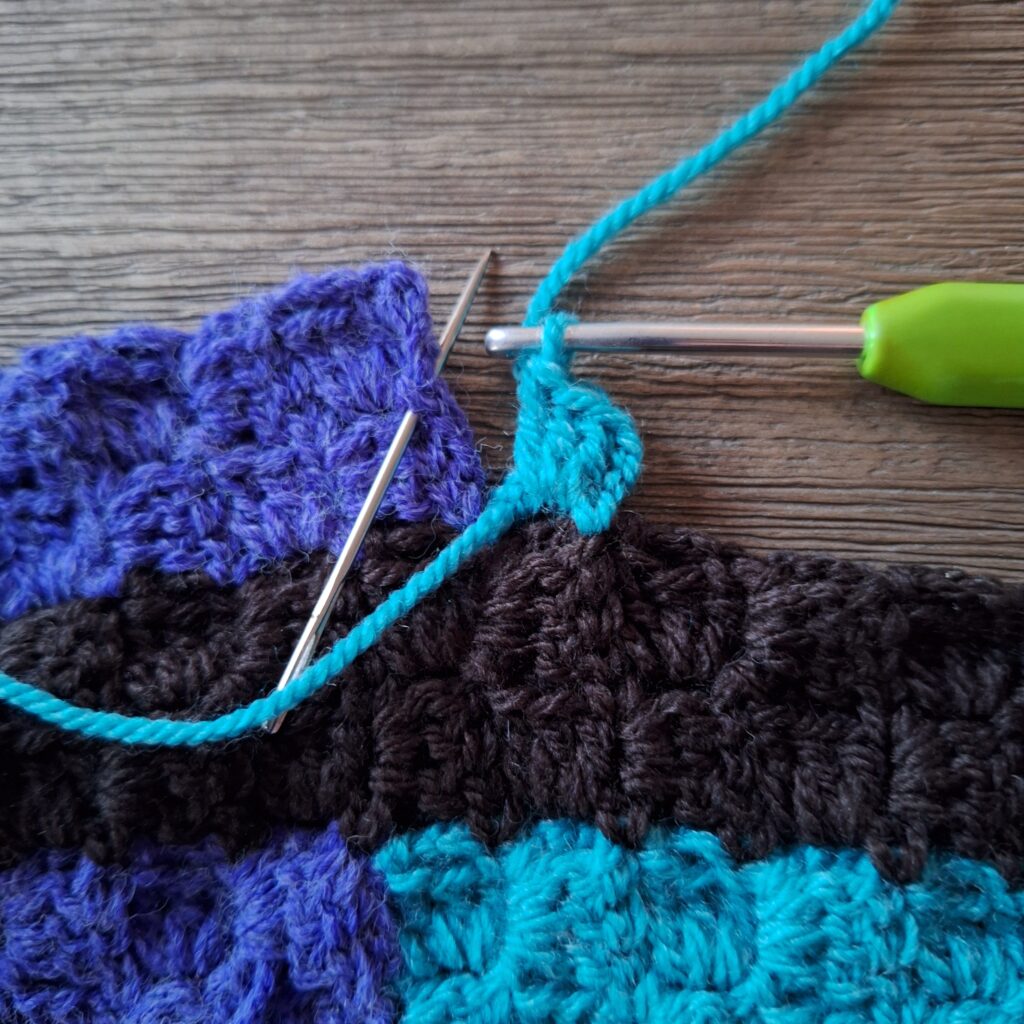
The block you just made has the double crochets in the opposite direction as the blocks right next to it and below it, can you tell? So your new one has vertical double crochets, but the one next to it and below it have horizontal double crochet. Check this for each and every colour change: this should always be the case.
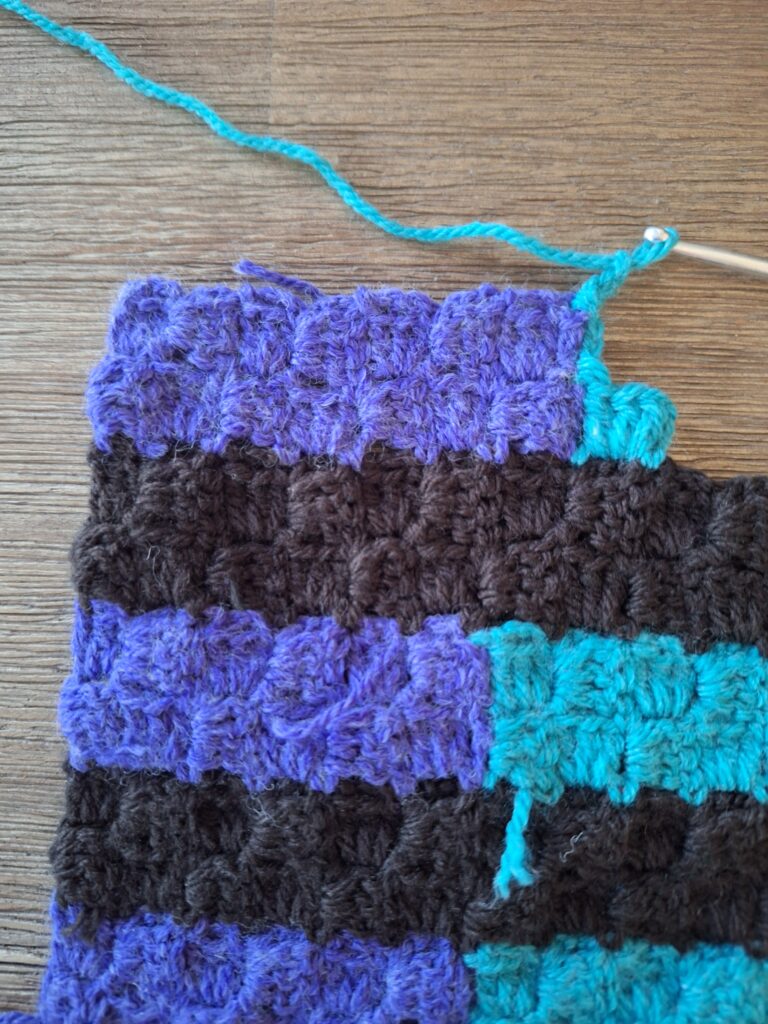
Darn away the begin yarn, pull the yarn through the last double crochet and through the chain 3.
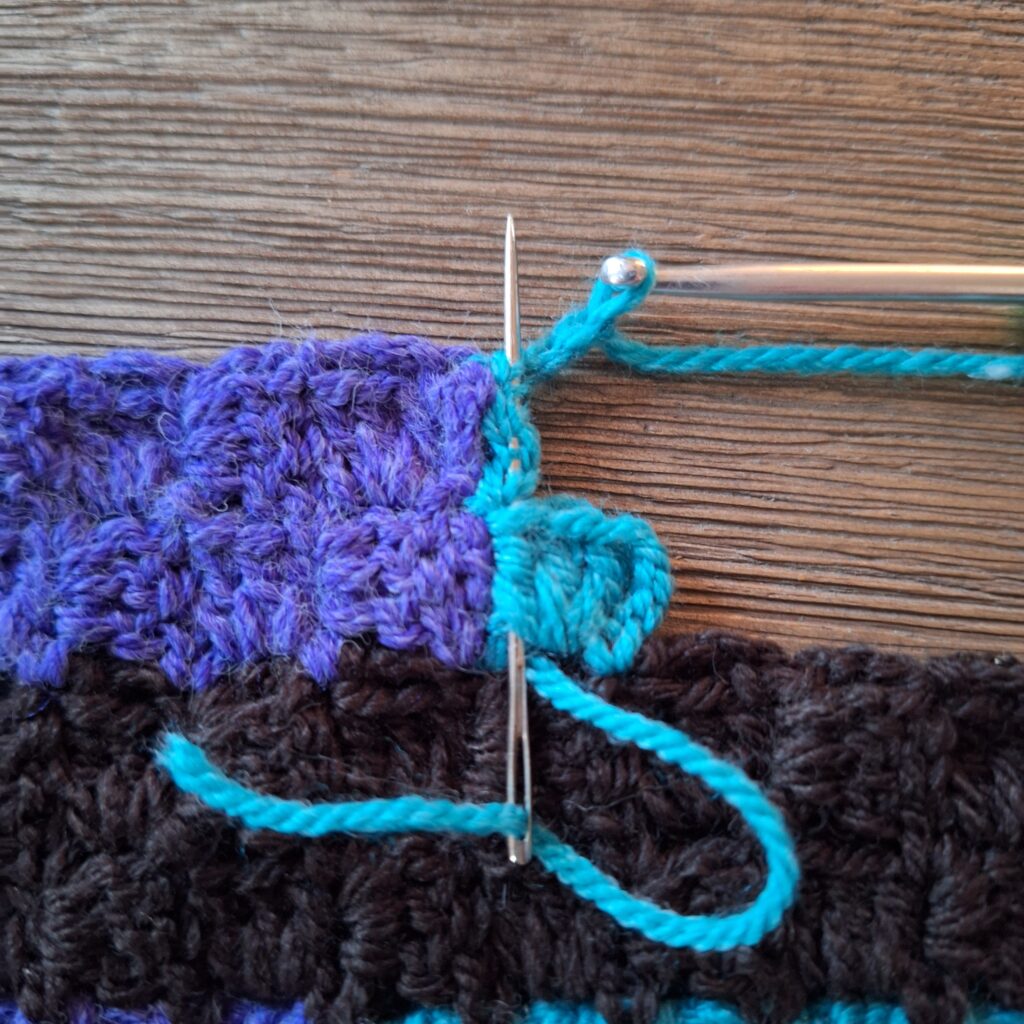
3 double crochet into the chain space you just created in this colour. Now you can continue like you’ve made the other panels in the first four strips.
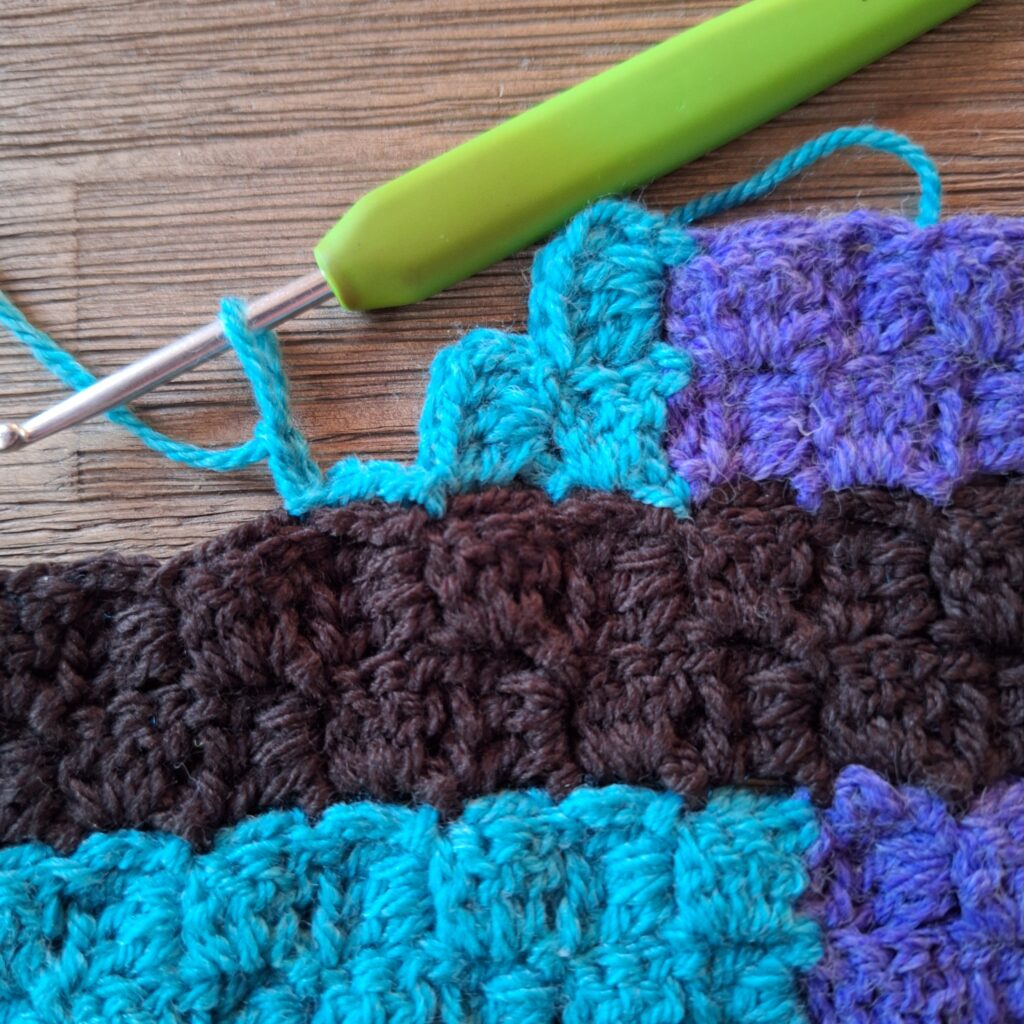
Make your strip 12 by 2 blocks. At the end you’ll darn it off again, same as for strip 5 panel 1. Chain 3…
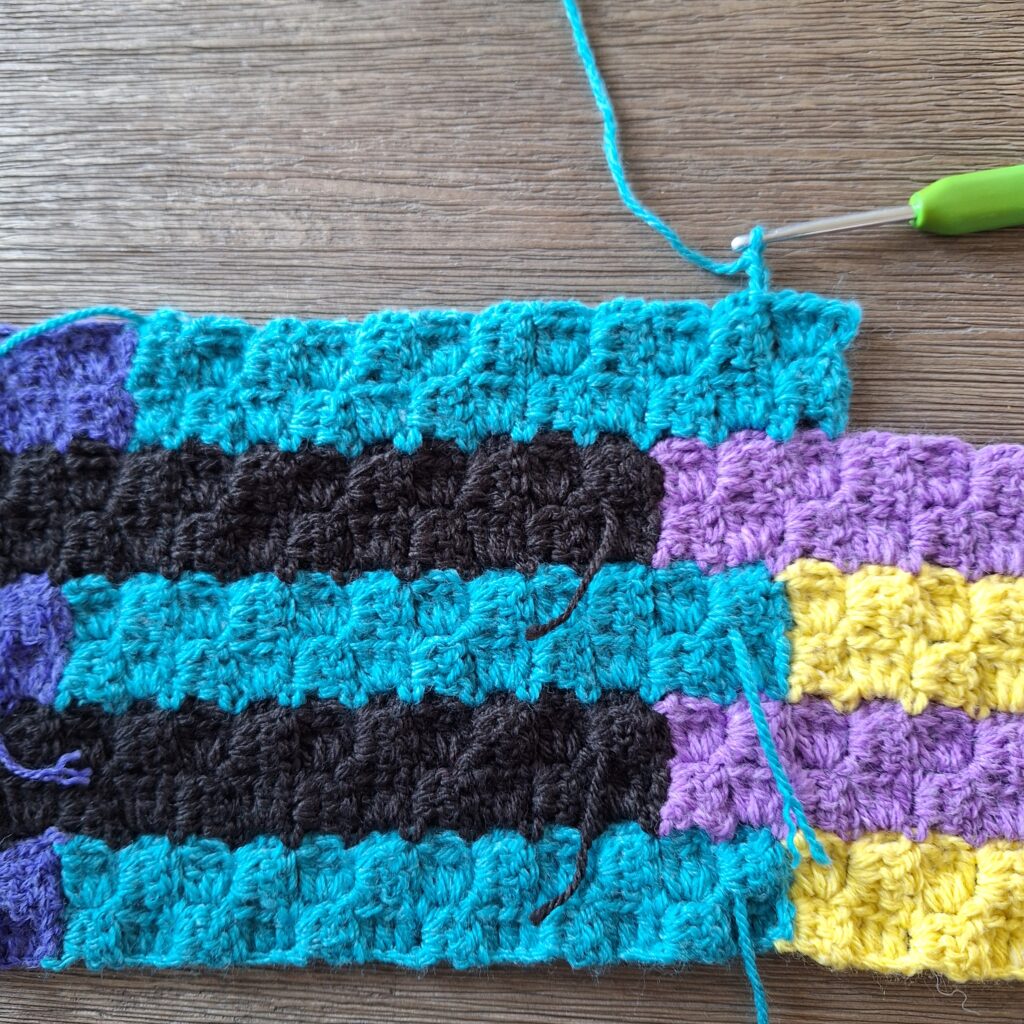
Slip stitch into the utmost corner of this panel.
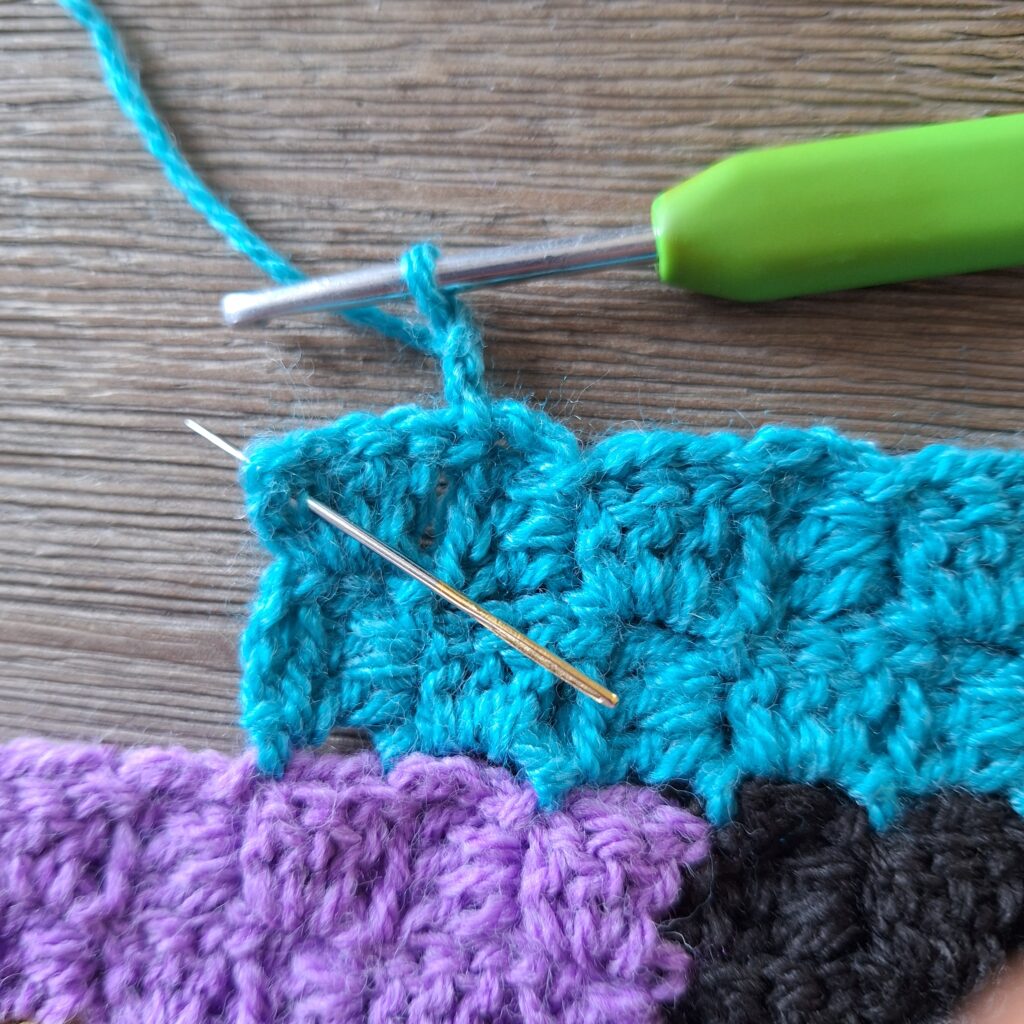
Chain 1, cut the yarn, pull through, put in a darning needle and pass through the side of the panel.
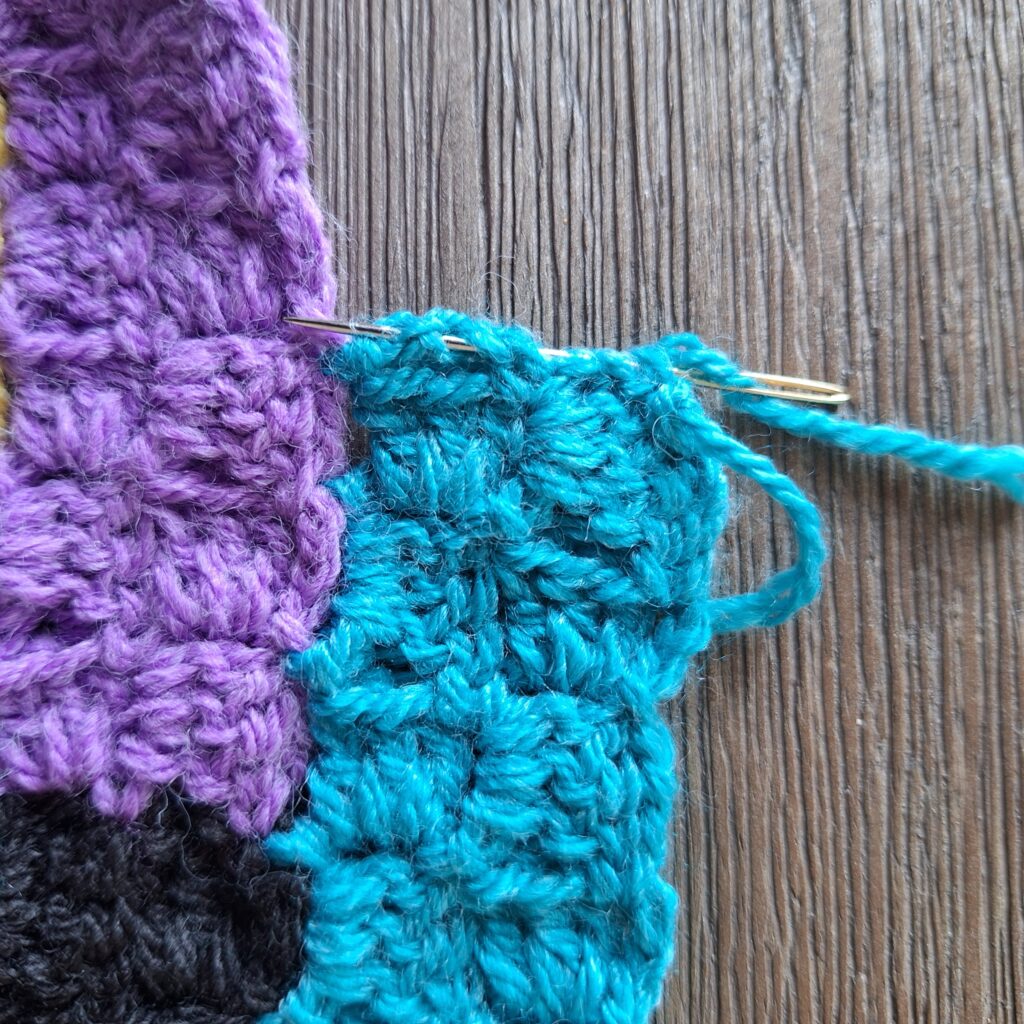
Darn away the remaining thread and cut.
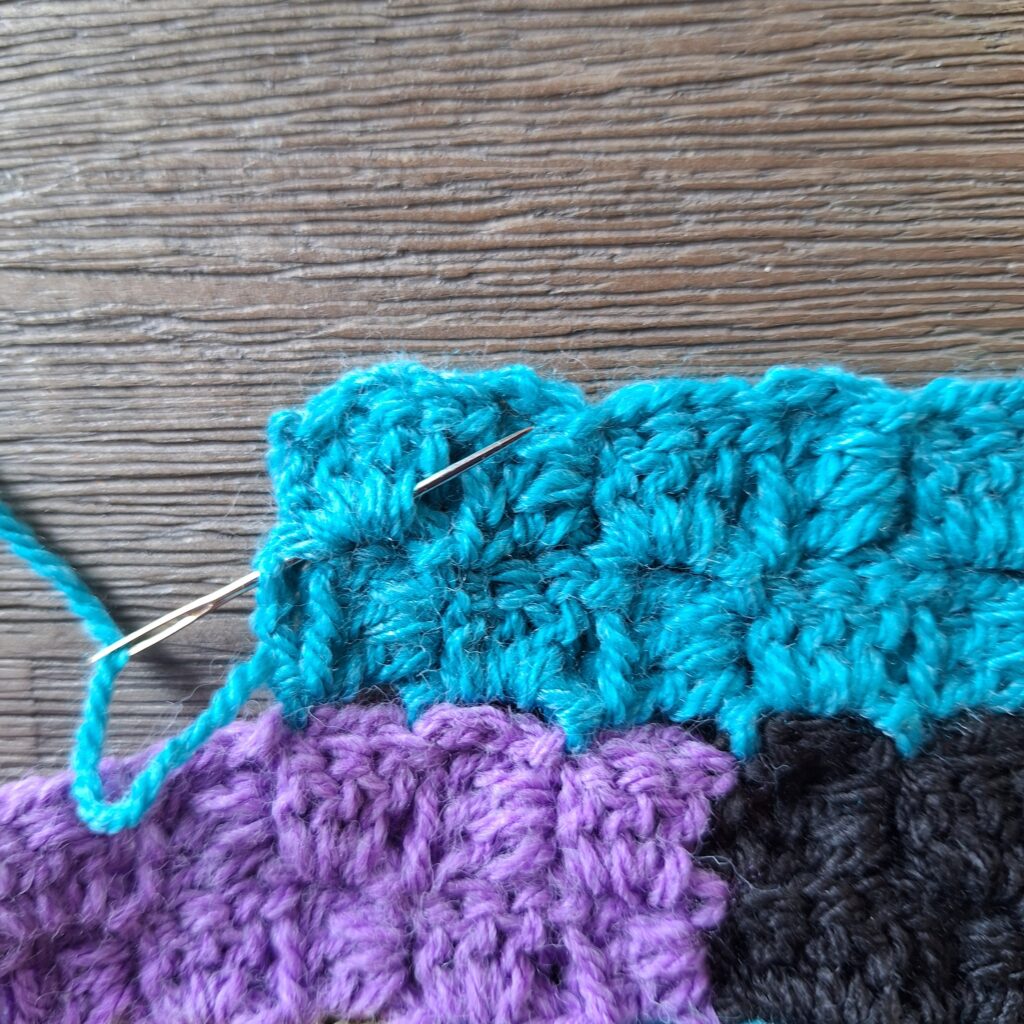
Strip 5 – Panel 3-5
Make this strip like you’ve done before. Please keep paying attention to the direction and orientation of each new colour.
Colors and number of blocks for strip 5:
- Strip 5: Panel 1: 2 blocks high and 7 blocks wide in Colour A
- Strip 5: Panel 2: 2 blocks high and 12 blocks wide in Colour B
- Strip 5: Panel 3: 2 blocks high and 12 blocks wide in Colour C
- Strip 5: Panel 4: 2 blocks high and 12 blocks wide in Colour D
- Strip 5: Panel 5: 2 blocks high and 15 blocks wide in Colour A
Strip 6
Strip 6 – Panel 1: 2 blocks high and 15 wide; Colour E
Start panel 1 in Colour E and make in the same way as strip 2-5.
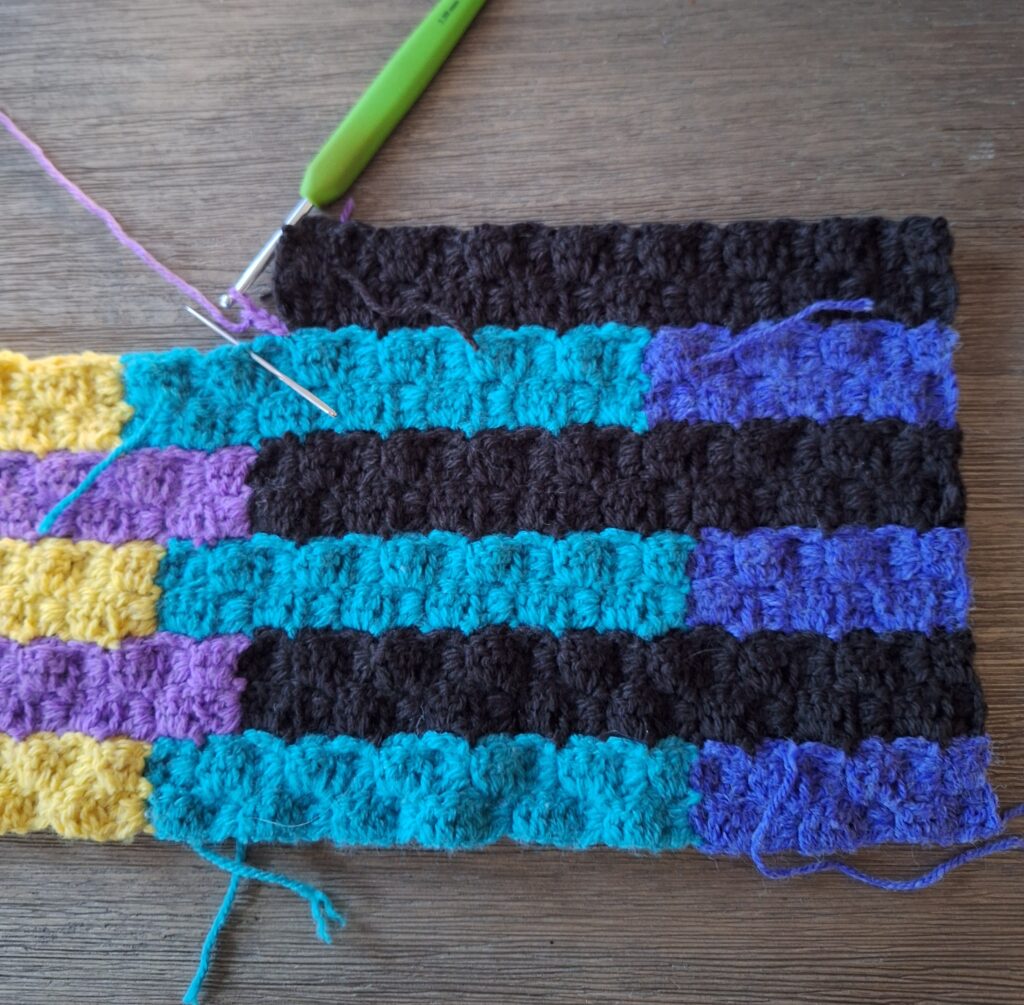
Strip 6 – Panel 2: 2 blocks high and 12 blocks wide; Colour F
You change colour here, based on the method to produce a vertical block first: attach in the corner between strip 5 and panel 1 of strip 6, chain 3, slip stitch into the slip stitch between 2 blocks of the previous strip (see needle). Chain 3, turn, make 3 double crochet into the chain space. Slip stitch into slip stitch between the two blocks of panel 1, strip 6.
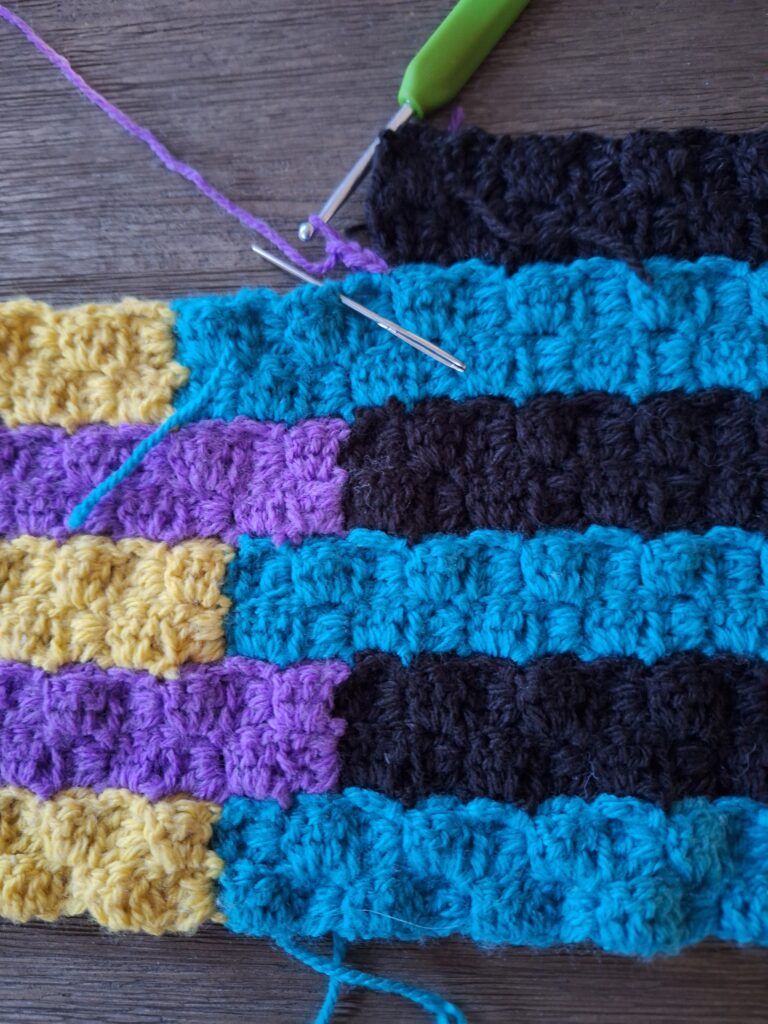
The block you’ve made now, is in opposite direction of the block beside and beneath it.
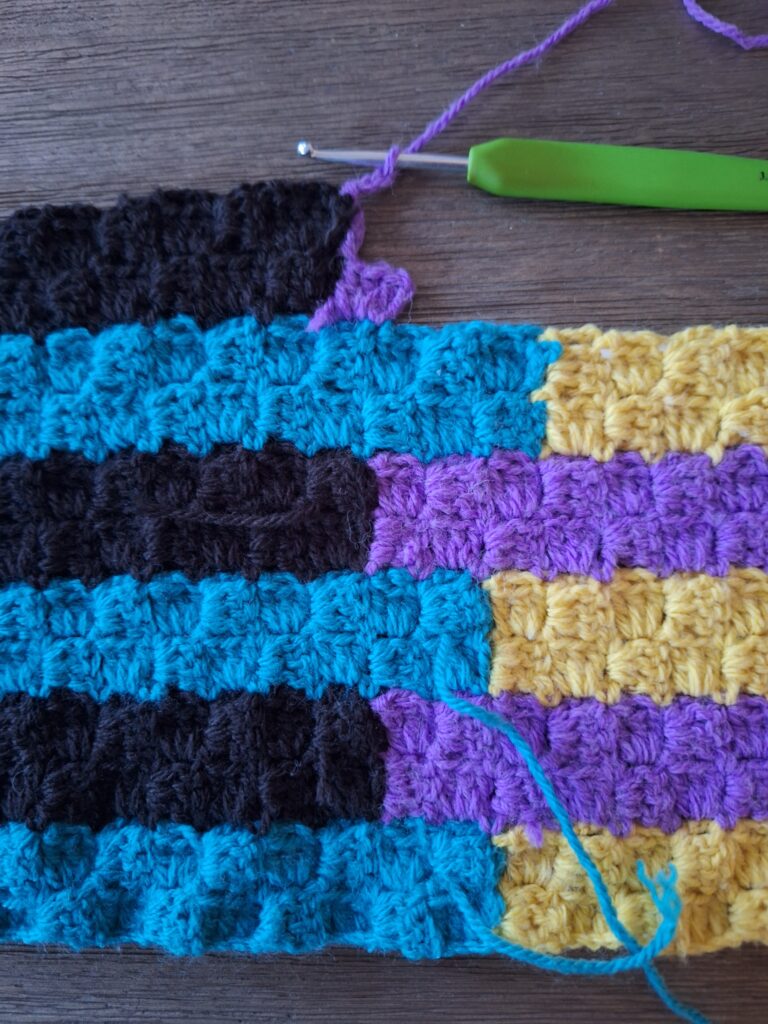
Strip 6 – Panel 3-5
Finish this strip:
- Strip 6 – Panel 3: 2 blocks high and 12 blocks wide in Colour G
- Strip 6 – Panel 4: 2 blocks high and 12 blocks wide in Colour H
- Strip 6 – Panel 5: 2 blocks high and 7 blocks wide in Colour E
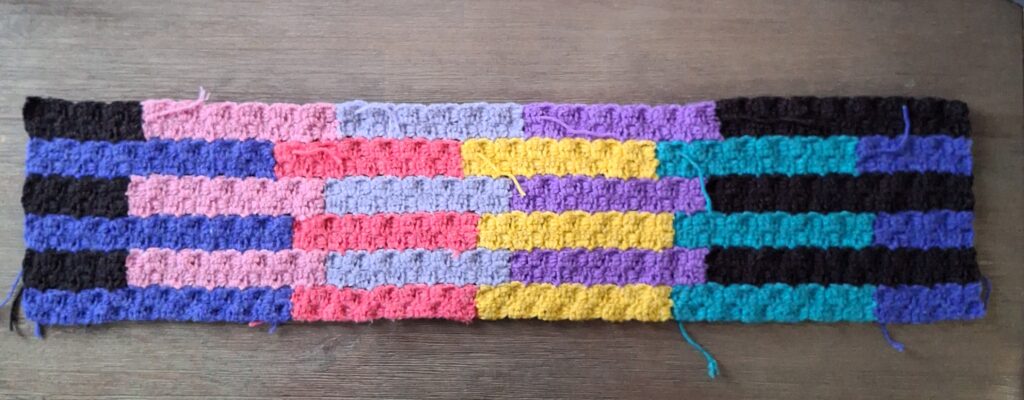
Strip 7-19
Are you enjoying the process of seeing it grow beneath your hands?
Strip 7
- Strip 7 – Panel 1: 2 blocks high and 9 blocks wide in Colour A
- Strip 7 – Panel 2: 2 blocks high and 12 blocks wide in Colour B
- Strip 7 – Panel 3: 2 blocks high and 12 blocks wide in Colour C
- Strip 7 – Panel 4: 2 blocks high and 12 blocks wide in Colour D
- Strip 7 – Panel 5: 2 blocks high and 13 blocks wide in Colour A
Strip 8
- Strip 8 – Panel 1: 2 blocks high and 14 blocks wide in Colour E
- Strip 8 – Panel 2: 2 blocks high and 12 blocks wide in Colour F
- Strip 8 – Panel 3: 2 blocks high and 12 blocks wide in Colour G
- Strip 8 – Panel 4: 2 blocks high and 12 blocks wide in Colour H
- Strip 8 – Panel 5: 2 blocks high and 8 blocks wide in Colour E
Strip 9
- Strip 9 – Panel 1: 2 blocks high and 11 blocks wide in Colour A
- Strip 9 – Panel 2: 2 blocks high and 12 blocks wide in Colour B
- Strip 9 – Panel 3: 2 blocks high and 12 blocks wide in Colour C
- Strip 9 – Panel 4: 2 blocks high and 12 blocks wide in Colour D
- Strip 9 – Panel 5: 2 blocks high and 11 blocks wide in Colour A
Strip 10
- Strip 10 – Panel 1: 2 blocks high and 12 blocks wide in Colour E
- Strip 10 – Panel 2: 2 blocks high and 12 blocks wide in Colour F
- Strip 10 – Panel 3: 2 blocks high and 12 blocks wide in Colour G
- Strip 10 – Panel 4: 2 blocks high and 12 blocks wide in Colour H
- Strip 10 – Panel 5: 2 blocks high and 10 blocks wide in Colour E
Strip 11
- Strip 11 – Panel 1: 2 blocks high and 13 blocks wide in Colour A
- Strip 11 – Panel 2: 2 blocks high and 12 blocks wide in Colour B
- Strip 11 – Panel 3: 2 blocks high and 12 blocks wide in Colour C
- Strip 11 – Panel 4: 2 blocks high and 12 blocks wide in Colour D
- Strip 11 – Panel 5: 2 blocks high and 9 blocks wide in Colour A
Strip 12
- Strip 12 – Panel 1: 2 blocks high and 10 blocks wide in Colour E
- Strip 12 – Panel 2: 2 blocks high and 12 blocks wide in Colour F
- Strip 12 – Panel 3: 2 blocks high and 12 blocks wide in Colour G
- Strip 12 – Panel 4: 2 blocks high and 12 blocks wide in Colour H
- Strip 12 – Panel 5: 2 blocks high and 12 blocks wide in Colour E
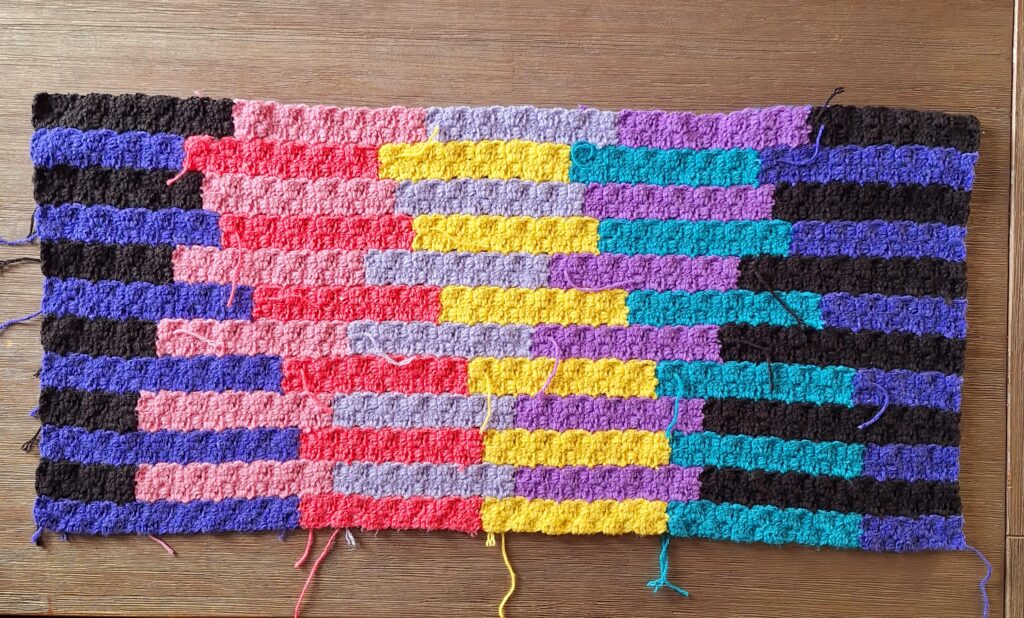
Please be mindful of the colours, the darning in of the ends and the direction of your first made block when changing colours. After strip 12, it should look like this:
Strip 13
- Strip 13 – Panel 1: 2 blocks high and 14 blocks wide in Colour A
- Strip 13 – Panel 2: 2 blocks high and 12 blocks wide in Colour B
- Strip 13 – Panel 3: 2 blocks high and 12 blocks wide in Colour C
- Strip 13 – Panel 4: 2 blocks high and 12 blocks wide in Colour D
- Strip 13 – Panel 5: 2 blocks high and 8 blocks wide in Colour A
Strip 14
- Strip 14 – Panel 1: 2 blocks high and 8 blocks wide in Colour E
- Strip 14 – Panel 2: 2 blocks high and 12 blocks wide in Colour F
- Strip 14 – Panel 3: 2 blocks high and 12 blocks wide in Colour G
- Strip 14 – Panel 4: 2 blocks high and 12 blocks wide in Colour H
- Strip 14 – Panel 5: 2 blocks high and 14 blocks wide in Colour E
Strip 15
- Strip 15 – Paneel 1: 2 blocks high and 15 blocks wide in Colour A
- Strip 15 – Paneel 2: 2 blocks high and 12 blocks wide in Colour B
- Strip 15 – Paneel 3: 2 blocks high and 12 blocks wide in Colour C
- Strip 15 – Paneel 4: 2 blocks high and 12 blocks wide in Colour D
- Strip 15 – Paneel 5: 2 blocks high and 7 blocks wide in Colour A
Strip 16
- Strip 16 – Panel 1: 2 blocks high and 7 blocks wide in Colour E
- Strip 16 – Panel 2: 2 blocks high and 12 blocks wide in Colour F
- Strip 16 – Panel 3: 2 blocks high and 12 blocks wide in Colour G
- Strip 16 – Panel 4: 2 blocks high and 12 blocks wide in Colour H
- Strip 16 – Panel 5: 2 blocks high and 15 blocks wide in Colour E
Strip 17
- Strip 17 – Panel 1: 2 blocks high and 16 blocks wide in Colour A
- Strip 17 – Panel 2: 2 blocks high and 12 blocks wide in Colour B
- Strip 17 – Panel 3: 2 blocks high and 12 blocks wide in Colour C
- Strip 17 – Panel 4: 2 blocks high and 12 blocks wide in Colour D
- Strip 17 – Panel 5: 2 blocks high and 6 blocks wide in Colour A
Strip 18
- Strip 18 – Panel 1: 2 blocks high and 6 blocks wide in Colour E
- Strip 18 – Panel 2: 2 blocks high and 12 blocks wide in Colour F
- Strip 18 – Panel 3: 2 blocks high and 12 blocks wide in Colour G
- Strip 18 – Panel 4: 2 blocks high and 12 blocks wide in Colour H
- Strip 18 – Panel 5: 2 blocks high and 16 blocks wide in Colour E
Strip 19
- Strip 19 – Panel 1: 2 blocks high and 16 blocks wide in Colour A
- Strip 19 – Panel 2: 2 blocks high and 12 blocks wide in Colour B
- Strip 19 – Panel 3: 2 blocks high and 12 blocks wide in Colour C
- Strip 19 – Panel 4: 2 blocks high and 12 blocks wide in Colour D
- Strip 19 – Panel 5: 2 blocks high and 6 blocks wide in Colour A
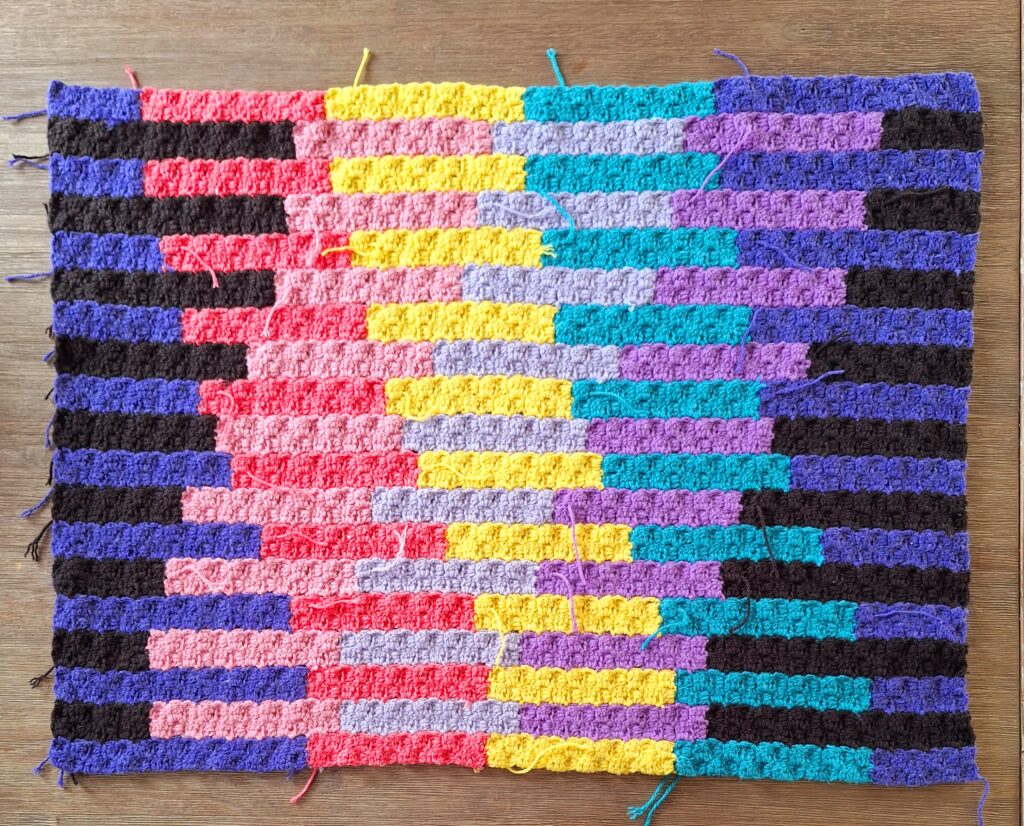
This is what it looks like after strip 19:
Show your work!
I hope you manage to crochet this project in a wonderfully relaxed way. Don’t worry about your pace, all information will remain online here until the end of time, so you have plenty of time to ‘fall behind’. You really won’t see that in the final result.
We’d love to see your results, please tag us with @eenmooigebaar, @hook_to_hook en @scheepjes. You can also join the amazing International Scheepjes Facebook Group for questions and to show off and join in the MAL fun!
Scheepjes Crochet in my DNA MAL – Links
- Nederlands
- English US
- English UK
- YouTube
- YouTube Channel
- Nederlandse Proeflapjes
- English Swatches
- YouTube Channel
Creatieve, enthousiaste en lieve Iris van Meer is het gezicht achter Een Mooi Gebaar en vertaalt, ontwerpt en deelt meer dan duizend haakpatronen met jullie op dit stukje internet.
Mijn verhaal, over hoe ik van onhandige knutselaar toch nog creatieve ondernemer ben geworden, lees je hier: Mijn Verhaal
Als je contact met Iris wil opnemen, ga je naar de contactpagina

Cheryl
Wednesday 7th of May 2025
Does it matter if you slip stitch, chain and turn versus slip stitch turn and then chain?
Iris van Meer
Thursday 12th of June 2025
No, I'd say that doesn't matter
Jo
Wednesday 7th of May 2025
So, to check my understanding, the vertical starts to blocks come on the rows with an odd number of blocks in the first and last panels? If there is an even starting panel, then all of the panels start in the usual way.
Iris van Meer
Wednesday 7th of May 2025
Yes, I think that's correct in this pattern. Just pay close attention to the first one!